Wednesday, July 29, 2015

Setting up for your Charity Event

Good morning everyone,

Well, you have done all the hard work. You secured a great community event that you are proud to stand behind. You arrive at the event with your camera and are ready to take some great photographs.

People come and go, you ask if they would like to have their photographs taken, but you only seem to get one or two people willing to have their photographs taken. What is wrong? Didn't you tell the organizer that you will be turning up? Why is everybody not so interested in having a photograph taken?

Well for starters let me tell you that just turning up for an event does not guarantee that you will have a successful event. You have to come prepared. Here are a few tips that I found helps build a great relationship with the event organizers and the customers or guests that will be attending your event.

Here is what I have done to ensure that I have the exposure and response that I want.


  • Arrive at the event early. The reason you do this is to make sure you have the best location and you can also work out some logistics with the organizers or shop owners.
  • Make sure you choose a location where you get the most feet passing through. You should also try and not interfere with regular business, but the location is good enough so that everyone can see you.  Now as a photographer it is not always about taking the photographs. Yes, it is important, but a lot of what you do as a photographer is marketing yourself. 
  • You need to setup a table. Yes, bring along a folding table where you can display your promotional material. You will need some flyer's, business cards and other marketing material that is small and easy to grab. You want people to leave the event with some of your marketing material. It is a place to pull people in, so make it interesting and people can take that along with them when they either pass your table or when you are finished with your session. I found a great place for some customizable marketing material. Have a look at Designaglow 

You want to make a great impression and also let them know that you are a professional studio that could actually do more than what you are currently helping the community with.

  • A great investment would also be creating a beautiful pop-up banner or posters of your work. This you can put up a strategic points throughout the event if it is allowed or even above the table. It gives the visual visitor a great 1st impression about some of the work that you can do. Vista Print offers some really great deals in getting pop-up banners where you can use your own photographs.
  • Props. I don't know how many times these have made a photograph as well as made me some extra profit. People want to see something different and if they are holding a prop it also gives them something to do with their hands. Bring along large photograph frames, stuffed animals for the small children if that is who you are catering to. The props have to be related to your event so don't forget to add them to make your special day even more memorable.
  • You need an assistant! As you can see from all the work that goes into a charity or community event. You will need someone to help carry and setup. Phone some friends or even extend your reach even further and approach other students doing photography in your area and discuss it as an "intern" or training event. It is a great way to get some help and it may lead to additional teaching classes where you can make some additional money. You never know.
  • Don't forget to take some photographs of the sponsors venue, location or shop. Also take photographs of people involved in the event. These can be used for future advertising for the company and it can be another revenue stream. It is also a great way to stay in-touch. A framed photograph could also be a gift to them for letting you use their venue. A great framed photograph hanging in their offices or shop is a fantastic way to get some free advertising as employees talk about the great event that they had. Remember to leave some pamphlets and business cards with the owners when you leave.
So in closing, there is a lot of work that needs to be done before you even pick up a camera for your event.

Invest in your promotional material. They are items that can be used over and over again. You will need a great banner. WHCC also makes some great banners where you can create a collage instead of a single photograph. The stand alone banners are the best because you can put them around the event.

Finally, don't forget to carry business cards on your person. You are not going to be at the table all the time so make sure to have enough to hand out to everyone.

And let me leave you with one final tip. Have a way to capture peoples names and email addresses for future marketing purposes. I use Chimpmail.com 

In connection with this application I also have Chimpadeedoo which is available for IOS and Android.It captures peoples Names and Email addresses when setup on your device. I normally leave my IPad with my assistant at the table and they, my assistants,  encourage people to sign-up and we will send them some promotional material or we have additional incentives at the table, where we offer them mini-sessions in the comfort or their own homes or at our studio. 

You can use any incentive to encourage people to sign-up so that you can get some additional information for your marketing campaign.


So have a great month of photographing. Just remember that being a photographer is just as important as being a great marketer. People have to see that you can take great photographs before they trust you. That only comes from practice and experience.

So we look forward to seeing all your photographs in the month of August.


Monday, July 27, 2015

Hello All,


I hope everyone had a great weekend.  I'm going to turn the tables on this post for this week and ask for your advice or opinions.  I am just finishing up my studio class which I really enjoyed.  There were a couple of areas that I struggled though.  While photographing on white seem less paper, I had a problem with getting a heavy shadow on the paper and I eventually got it right but any tricks that anyone knows to help with this would be appreciated.  I am about to start my advanced studio class and I am thinking that I am going to need to do some more assignments that are similar. 


I also have to say with the studio class the directions for each assignment were very confusing.  There were conflicting instructions with every assignment.  It would say one thing early in the directions and then say something different further into the directions.  This may be something that should be looked into.  I really hope that the advanced studio class has an easier program to follow. 


So any advice that anyone has for me about the advanced studio class would be a great help.  Anything would help.


Barbara Ann

Sunday, July 26, 2015

The Diopter

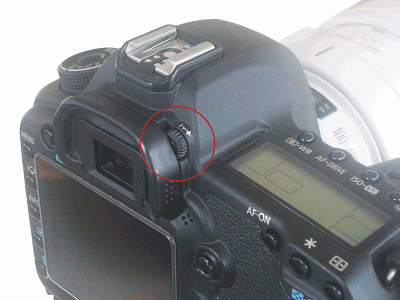
Another question I have been asked a number of times is “what in the world is this small wheel by my viewfinder?” That “wheel” is called the diopter and it serves a very handy purpose for those that need it.


That little wheel circled in red in your vision diopter
 Not everyone has 20/20 vision, many people wear glasses or contacts to make up for our eye’s natural failings and this is where the diopter comes in. When using a camera, it is often not comfortable to wear your glasses as they tend to get in the way. I personally have glasses but only need them for reading and only then because my right eye is slightly weak.

The diopter allows people that normally wear glasses to use their viewfinder without them and still see clearing, although it’s use is primarily only for shooting using manual focus. The diopter has no marking index or starting point, you simply look through your viewfinder without your glasses and if the viewfinder seems to be blurry then adjust the diopter slowly one way or the other until the readout becomes clear.
On the left is before adjustment, on the right, after adjusting the diopter
The diopter only has adjustment from -3 to +3, so it might not be able to compensate for everyone’s vision, some people who are extremely near or far sighted might need to purchase a custom diopter lens to be added to their camera to make their viewfinder clear and sharp for their eyes. It is also possible for the diopter to accidentally get bumped and out of whack for your vision, just tune it back to your eyes and everything is back to normal for you. If you are in a situation where you share your camera with a friend or family member, the diopter will need to be adjusted each time one of you uses the camera.

Now that you have a better understanding of that tiny wheel next to your viewfinder, adjust yours to your eyesight and then get out there and make some great images!


Comments/Questions

Wednesday, July 22, 2015

Giving Back Update

Good Morning everyone.

I am sure so many of you have already reached out to your community, thinking about something that you could do in giving back to the community.

Yes it is a great way to help a company that might not have the skills or even the budget to raise funds for their cause. They might just be starting out or the work they do might not be as glamorous or exciting as everyone would like them to be.

The reason we give back is first and foremost to help a cause that we believe in. Don't ask a company with the sole intention of you been the only beneficiary. How can you use your craft to better help the company that you are photographing increase their presence in the market place? How can you make their lives better? Are you able to raise additional funds for the business?

If you can help them answer just one of those questions then I am sure you are making a difference.

Now, if you have not found something to contribute to then may I suggest you send a message or post through Facebook. I sent such a post through Facebook just over a month ago and a client I just photographed forwarded the post to someone that they knew and that is how I found my first charity organization.

A director from the Schwartz Organization  sent me an email and wanted to know if I was available to photograph one of their gala evening presentations.

Well, if this is the first time that you are giving back to the community it might be the ideal way to see how everything works with regards to giving back. I asked them what they required? They wanted a few photographs of all the people attending and that is all that they required. It was a simple yet easy way to get myself some exposure.

Now the important question you need to ask when you are doing something for the community. The question is not "How can I benefit from something like this?" The question you need to ask is ,

"Is their a way I can leverage your event to let people know about me as a photographer?" You can always phrase the words a little better. (I know I am not the best with words.) But by asking this question you are ensuring that you get something from doing some photographs for the event.

The response that I got was, "There are going to be about 350 gift basket for all those that donated to the organization and you can add your promotional cards to that basket." That is just what I wanted. I got to add one of my professionally made postcards with some of my best photographs on it, into a gift basket of some of the more generous donors in the community.

I was getting access to a marketing list that is not often available to a local photographer. Don't you think that that is worth 2 hours of your time?

So, I recommend you try Facebook or any other form of social networking to find some contacts. You will never know what will come from it. It is a great place to start and the important part of this exercise is making contacts. You are building your database of contacts for the future.

So have fun out there and don't worry too much about find the perfect charity or organization, but rather find an organization where you know you can make the most impact no matter what it is.

Happy shooting and we will speak again soon.

Denzil

Tuesday, July 21, 2015

Hello Everyone,


So sorry that my post is a whole day late, my internet has been limited so I had to come to my Moms house to post this today. 


I wanted to talk today about how much I am enjoying this studio photography class.  The lighting is sometimes so difficult to get right but I keep telling myself that is how we learn right.  My favorite assignments so far have been the root beer and the sparkling water.  As much as I will always love natural lighting and it is my favorite, this class has been quite an exciting journey.  It makes me wonder what kind of things we will be doing in advanced studio techniques.  If anyone has taken advanced yet and has any thoughts about it feel free to let me know. 


I also wanted to see how everyone was doing with the August photo challenge.  I hope you are all out there looking into what you can do to donate your time and services for one day or a couple hours in August.  Remember, this will be a fun thing and it will promote your business.  It will also give you the great opportunity to meet so many new people which is always a great thing.  If you are having trouble finding something don't forget to look in your local paper and on the internet for events in your county.  I would like to hear some of the ideas people are thinking and I'm really excited for all of this. 


I hope everyone is having a wonderful summer so far. 


Barbara Ann

Sunday, July 19, 2015

Tripods

This week’s blog post I want to talk about a piece of equipment that is crucial for photographers. This item is the center of a certain amount of controversy, as some photographers will tell you that you never need one or your better off without one as it’s too much hassle to carry one with you. The item we are talking about today is the tripod and how it is used to make your photography more interesting.

Many photographers hate tripods because they are bulky and cumbersome to lug around all the time, but tripods are also one of the best ways to get great photos, especially in low light situations. Let’s say you want to shoot some long exposure images either in daytime or night, how are you going to use those long shutter speeds without having blurry images? Why use a tripod of course along with a cable or remote shutter release.

The reason long exposure requires a tripod is because you cannot hold a camera steady enough in your hands to shoot low shutter speeds. It doesn’t matter how small your camera is, let’s say you are using the Canon SL1 which is very small and light weight and even if you are a body builder by day, you cannot hold that camera perfectly still no matter how hard you try. The very slightest movement will cause the images to blur badly. Now don’t think I am picking on you, it’s just not possible to hold a camera steady enough for long exposure, especially since you have to be able to press the shutter without the camera even slightly flinching.

Wall of Light, Canon EOS 5D EF 40mm STM F/2.8 ISO 100 shutter 30 seconds on tripod
 A tripod is what will give you the strong, still platform with which to get those great long exposures that make water look like glass or a waterfall look like silk. The tripod is nothing more than a set of legs for your camera, three of them to be exact, and those legs will keep that camera steady. Now I am sure you are asking “What tripod should I buy, so that I can get a good one?”

I understand as students money is often tight, but you need to make sure you get a good tripod, one that will serve you well for years as a tripod is one piece of equipment that you do not need to upgrade all the time. If you are on a tight budget, I would recommend getting one of the lower cost plastic tripods from Amazon or Best Buy. Manfrotto and Sunpak come to mind as a couple of makers of some half way decent low cost tripods. You can get one of these tripods for around $50-$100. If you want to kill two birds with one stone, then buy a combination tripod/monopod so you get both camera mounting systems in one package. In this tripods, the center column (where you mount your camera) can be pulled out completely and used as a single leg monopod like this one from Sunpak.

http://www.bhphotovideo.com/c/product/517979-REG/Sunpak_620_060TM_6601TM_Tripod_Monopod_with_3_Way.html

But there are a couple of other things to keep in mind with a tripod. The first one is really major and that is it’s weight rating. When buying a tripod, you need one that can support the combined weight of the camera body and lens you are going to shoot with. Say for example, I have the Tamron SP 150-600mm Di VC USD lens, which weighs 4.5 pounds on it’s own. I cannot buy a tripod that is only rated for 4-5 pounds as my camera also weighs 2-3 pounds with battery grip and memory card, I need a tripod rated for 10 pounds plus to be on the safe side.

Even if you are using a small lens like the EF 40mm STM lens also known as the pancake lens, which only weighs 4.6 ounces, your camera still weighs in at another 19 ounces without the battery or a memory card. Besides, even if you shoot most of the time with this kit, sooner or later you will run into a need to use a tripod with your heavier telephoto lens, trust me, it happens to the best of us.

EOS 6D EF 50mm F/2.5 Macro at F/4 ISO 100 Shutter 500 on Gitzo tripod lowered to ground
The second item I recommend you consider when buying a tripod is the weight of the tripod itself. Now the plastic tripods I mentioned earlier are fairly light weight, coming in at 4.2 pounds, but they can also only carry 4 pounds. If you can afford it, I would recommend an aluminum or carbon fiber tripod for strength. Both of these tripods can hold more weight and be completely steady for you. I have a Manfrotto professional grade tripod that can handle 18 pounds. I just recently bought a Gitzo carbon fiber tripod which only weighs 3 pounds but can safely hold 12 pounds. The Gitzo can do this because carbon fiber is very strong material, but there is a trade off, the price. My Gitzo cost around $700, but a good aluminum one can run that much as well, the difference is the aluminum tripods I have weigh a lot, like 6-10 pounds and the Gitzo is much lighter but can still hold a decent amount of weight.

The last thing I recommend when buying a tripod is get one with legs that allow you to drop the tripod to the ground. There are quite a few models that have releases at the top of the three legs that you press and you can fold the legs to the point where your camera is only inches off the ground. These tripods are great for Macro photography, or anytime you want to get a really interesting point of view. If you want one of the really good tripods for class (which you will need a tripod for some classes), but you cannot afford several hundred dollars for the aluminum or carbon fiber one, consider renting one. You can go to www.borrowlenses.com or www.lumoid.com and rent one for a few dollars a week and have a nice strong tripod for those classes that require one.

Now get out there and do some tripod photography!

Comments/Questions

Friday, July 17, 2015

Nearing the finsh line line - Semi Pro Season and Internship

There is just a couple weeks left of my internship and the time has just flown by.  The local Semi-Pro leagues that I work with had an upsetting blow this week. Our commissioner of the two local leagues I shoot, has elected to step down at the end of this season. This does not mean that these leagues won't be in existence next year it just means to be in existence, someone else must take over.

As I have been working with these players and teams for the last few years it makes me a bit bittersweet and worried what will happen next year. So it makes each game that I shoot right now   very important to me.

So here are some of my of my favorite things to shoot when I shoot semi-pro.

When I asked this team to look mean..this is what I got. Love the camaraderie in the Semi-Pro teams.

I sometimes say shooting semi-pro can be a bit of a wild card.  You never exactly know what kind of photographs you are going to get. The mood of the team you are shooting can completely change if they start to lose their game.

I always, always, also make sure I shoot the players children when I can. It is part of their fun memories.  Here is one of my favorites from last week's game.

                                I love it when the players' daughters want to be like their Dad's

I often try to keep in mind that while I have my goals on these types of shoots there are still moments I shouldn't miss while focusing on the game. While the players are having time outs. I always look for other shots I can grab like the one above.  Semi-Pro is rough.  It is hard on the body and it can also be mentally hard. The time the players play can last year or just a single session so I strive to make each moment count.

In looking at my favorite shots at a Semi Pro Game I had to include at least one action shot.  When I first started shooting these were the types of shots I loved the best.  However, now I look at them as if they are just part of the story.  (I'm lying - I love action shots - I just see them differently too).

       Marquelo fools the Spartans and takes off with the ball instead of throwing it.

This week as a mentioned was a rough week for our area of Semi-Pro ball.  There is already a bit of a power struggle with many different people wanting to take over the leagues, start their own leagues and the focus on this season is a bit muddied.  So my final shot shows why I personally shoot Semi Pro and why the players despite many obstacles still choose to play Semi-Pro.

 I actually refused to turn around and see what the player I had just teased was doing behind my back.

Ultimately semi-pro is supposed to be like this. It is supposed to be fun. It should be a friendly competition between guys who just love to play ball. To often you don't see that and it can become a bit disheartening as an intern.  However, every blue moon you get lucky and you get to see a game like this. A game where the teams had mutual respect for each other and could just have fun together.

Ok and maybe it didn't hurt that I got to shoot two former NFL players.

     Former Pittsburgh Steeler and Carolina Panther Mortty Ivy and Coach Keith Williams.

Sometimes even in the middle of an internship you have to stop and figure out what you love about what you are doing in your internship. There will always be challenges as you work with other photographers, videographers and owners who have a different creative voice than you do. Sometimes something about their vision or view point will really drive you crazy.  My word of advice is stay call and regroup. Stop and look at what you love about your internship. I promise it will truly help you.

I look forward to hearing what you do to stay focused.

Jessi