Showing posts with label Vision. Show all posts

Sunday, August 21, 2016

Focus Screen Part 1

This week’s blog post I wanted to write about a specific part of the camera system that you may or may not be familiar with, the Focus Screen.

The Focus Screen is a small piece of flat, translucent material, either ground glass or a fresnel lens. It is located inside the front of your camera where the lens mounts and help you acquire focus and frame your shot through your camera’s viewfinder.

Canon Eg-A Focus Screen
 There are various types of Focus Screens for most cameras and they can be either etched or non-etched. There are even Focus Screens which are made specifically for using low light lenses.

Some cameras have plain Focus Screens and others have etched ones that denote the focus points and even have a grid for maintaining your “Rule of Thirds”. Many of the newest mid-range and professional DSLRs have a plain Focus Screen with a monochromatic LCD overlay that reveals the focus points when you depress the shutter button halfway.

One of the interesting things about your Focus Screen, aside from the fact that many people do not realize their camera has one, or that it’s easily replaced, is the fact that if the Focus Screen picks up dirt, many photographers think it’s their sensor that’s dirty when that is not the case. If you are someone like myself that has an OCD thing about even the smallest spec of dust in my field of vision, the Focus Screen can be a source of annoyance.


Image of a dirty Focus Screen, courtesy of Ken Rockwell

Have you ever looked through your viewfinder and noticed little black specs or even tiny black strings? Well, chances are if you have seen this, it is your Focus Screen that is the culprit and not your sensor. Especially if you see the dirt, but it does not show up in your photos.

Cross Section of a DSLR, Number 5 is the Focus Screen
Focus Screens can be a pain to clean and there are specific methods to do so, which I will go into in my next post. For now, either try to ignore the dirt in your field of view if you can, or go on-line and order another Focus Screen and replace your old one. You can generally buy new ones for around $20-$35 a piece, but look up which model your camera came with originally and buy the same one. Most all Canon cameras come with what’s called the Precision Matte “Eg-A” Focus Screen and the new one will come with a special tool to remove the old one and put in the new one. Whatever you do, do not touch the Focus Screen with your fingers. My next post will be on how to remove and replace your Focus Screen as well as how to clean it PROPERLY.


Comments/Questions

Sunday, July 26, 2015

The Diopter

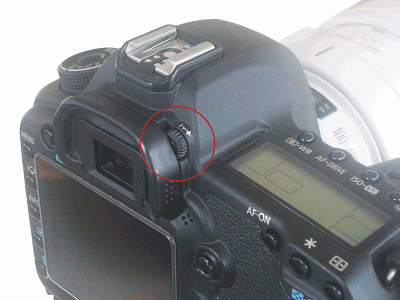
Another question I have been asked a number of times is “what in the world is this small wheel by my viewfinder?” That “wheel” is called the diopter and it serves a very handy purpose for those that need it.


That little wheel circled in red in your vision diopter
 Not everyone has 20/20 vision, many people wear glasses or contacts to make up for our eye’s natural failings and this is where the diopter comes in. When using a camera, it is often not comfortable to wear your glasses as they tend to get in the way. I personally have glasses but only need them for reading and only then because my right eye is slightly weak.

The diopter allows people that normally wear glasses to use their viewfinder without them and still see clearing, although it’s use is primarily only for shooting using manual focus. The diopter has no marking index or starting point, you simply look through your viewfinder without your glasses and if the viewfinder seems to be blurry then adjust the diopter slowly one way or the other until the readout becomes clear.
On the left is before adjustment, on the right, after adjusting the diopter
The diopter only has adjustment from -3 to +3, so it might not be able to compensate for everyone’s vision, some people who are extremely near or far sighted might need to purchase a custom diopter lens to be added to their camera to make their viewfinder clear and sharp for their eyes. It is also possible for the diopter to accidentally get bumped and out of whack for your vision, just tune it back to your eyes and everything is back to normal for you. If you are in a situation where you share your camera with a friend or family member, the diopter will need to be adjusted each time one of you uses the camera.

Now that you have a better understanding of that tiny wheel next to your viewfinder, adjust yours to your eyesight and then get out there and make some great images!


Comments/Questions

Tuesday, December 31, 2013

Your Portfolio...Work on it NOW!

Good Morning and welcome to another Terrific Tuesday!

As my days of doing blogs for the school are almost over, I want to take this opportunity and talk a little bit about portfolios.  The main point that I want to stress is that no matter what year or what class you are taking, you need to start thinking about your final portfolio presentation...right now!  Every single shooting assignment is a chance for you to work on your portfolio, every single image should be taken thinking that this might be the one that will land you a shooting assignment in the future.  It is better to have 300 great images where you get to choose 20-30 for a presentation than having less and then having to figure out how are you going to fill the empty areas.

If you are doing a 4-year degree, your last class is going to be PH430 Photography Portfolio. In this class there are going to be several areas that you will be presenting to your professor and working toward you last portfolio presentation.  This class is different from the e-folio class, and all the work you did on e-folio will be used again on PH430.  Here are some of the things that you will be working in your last class:

1. Portfolio, both in physical and online form
2. Mission, vision and artist statements
3. Presentation of your website
4. Branding, marketing and targeting of audience
5. Advertisement as well as left behind promotional materials
6. Example of your business card
7. Social media interaction and presence

Sounds like a lot?  Don't worry, you will be working on every aspect I mentioned above in other classes before getting to your last one.  The important thing is that you should be working on your brand in every class you take.

If you are going to be involved in Portraiture, use every class to build on it.  Every image of a subject or model should be geared and be the best you can produce, regardless of the assignment parameters.  Practice your posing techniques as well as your lighting schemes, make them interesting and with variety so you can use them later on.

If your area is going to be Fine Art or Architectural, be sure to take the Architectural Photography class and take the chance to build on your images.  You can also use the other classes such as Photo Essay, e-folio, and others to build on your images, techniques and variety in presentation.

Here are some sites that I hope will inspire you in some way toward creation of a unique presentation of your website and portfolio.

http://www.hongkiat.com/blog/50-great-photographers-you-should-know/

http://www.1stwebdesigner.com/inspiration/photographers-portfolio/

http://www.tripwiremagazine.com/2013/06/wordpress-photography-website-templates.html

Having problems with your branding?  Here is some help, hope it is useful for you.

http://www.iheartfaces.com/2011/06/branding-mistakes/

http://photographyspark.com/photography-branding-tips-ideas-for-studios/

http://digital-photography-school.com/ready-branding-your-photography-business-part-1-logos

Do you have a business card for your business?  Check out these two sites.

http://www.zazzle.com/photography+businesscards

http://us.moo.com/products/business-cards.html

I really hope all this information helps anyone out there, but remember the most important action right now is to get into the habit of using any photography assignment as a way to improve and build toward your portfolio.  By the way, on your last class, there will be shooting assignments, I am using them to explore and increase my presence and enhance my portfolio. hope you can all do it when the time comes!

Until next Year, this is your Tuesday Ambassador!

Have a great pixel full day!

And of course, be safe and have a HAPPY NEW YEAR!!!


Wednesday, December 18, 2013

Wide-Angle Wednesday

Good Morning PSPN and Welcome to Wide-Angle Wednesday!

My name is Corina and I’m a student studying in the BS Photography program. I just recently celebrated my first year at AI and look forward to blogging all about my experience and everything photography right here every Wednesday.

Why call it “Wide-Angle” Wednesday? Because “Hump Day” is over rated...dang camel!

Let’s see, a wide angle lens serves a purpose in two ways
  • ·        Gives you a wide angle of view
  • ·     Shorter focal length
The goal in blogging here at PSPN is to provide that wide-angle view in both our course study and our love for photography. It’s an opportunity to add emphasis and detail to your foreground studies, as you capture and hone your skills in the background. A shorter focal length is not a bad thing; it represents your passion to be up close and personal to your studies.

Take advantage of Wide Angle Perspective!

example of exaggerated wide-angle perspective

We have a wide angle view meaning objects up close will seem bigger in size than that of the background. Naturally in life, our short term goals are in the foreground and the long term goals fall into the background. We all strive to meet our long term goals but we can’t achieve perspective without the short term being upfront and completed first.  

So where am I going with the photography, wide angle lens lingo on a Wednesday?

Well I like to make comparisons and normally when I do, I use something recognizable to the audience. I’m also an inspiring landscape photographer, with a side of journalism. As photographers we may take a second or two to determine what lens we need, lighting, accessories, and settings we plan to use to capture the image. Sometimes the outcome is awesome, other times the outcome is a shot being missed. Let your time here be that awesome shot, in other words take more than a second to determine what you need as you go forward in learning new skills.   

We have all heard the saying “cross your t’s and dot your i’s”. I like to take it one step further and say don’t forget to capitalize your Education Opportunities and don’t let the assignment be the period to the end of practicing your new skills.


My photography inspiration comes from growing up in the Yosemite Valley in California. Anyone from the area has probably seen the works of Ansel Adams a thousand times over. At some point I thought an awesome job in life would be a Forest Ranger. Little did I know I would fall in love with the art, and the history behind the images. I still have a passion for the environment and being outdoors, I just rather wear a camera than a uniform. Below is a quote also well-known and used a lot in the photography world.
"You don’t make a photograph just with a camera. You bring to the act of photography all the pictures you have seen, the books you have read, the music you have heard, the people you have loved.” –Ansel Adams
In closing, let your path in photography be wide angled. Stay focused and your path will be filled with perfect shots. 

I look forward to next week's Wide-Angle Wednesday as it’s Christmas! Good day to capture memories and eat some good food.

From my camera to yours, may all your images tell a story!
The Wednesday Ambassador