Showing posts with label aperture. Show all posts

Sunday, May 8, 2016

Understanding Aperture

There are three key components of the “exposure triangle”, Aperture, ISO and Shutter Speed, and today we will be talking about Aperture.

An easy way to think of the Aperture of your lens is to think in terms of the human eye. Since your camera’s sensor “sees” things much as your eye does and then records those images in a physical form, we can think of Aperture the same way.

Every lens is made of a a group of glass elements and also a group of Aperture blades. The blades are what limits the amount of light passing into the lens and onto your sensor. These mechanical blades work the same way your pupil works, when in a low light situation, your pupils open up larger to allow more light in so that you can see better and when you are out in bright sunlight, they shrink down to tiny dots to reduce the amount of light coming in.

My Canon EF 50mm F/1.4 USM wide open at F/1.4

Aperture blades do the exact same thing, only mechanically and you control them. So a wide Aperture lens like my Canon EF 50mm F/1.4 USM when set at 1.4 is wide open, like your pupil is in low light and I can shoot better indoors at say a concert.

When I am shooting outdoors in sunlight, I will generally set my Aperture to say F/5.6 to F/8 and the blade will reduce the size of the hole in the center of my lens allowing less light into my sensor like the image below of the Canon EF 50mm F/1.8 II. The process of engaging the blades in your lens is known as stopping down as you are reducing the amount of light getting through the lens to your sensor.

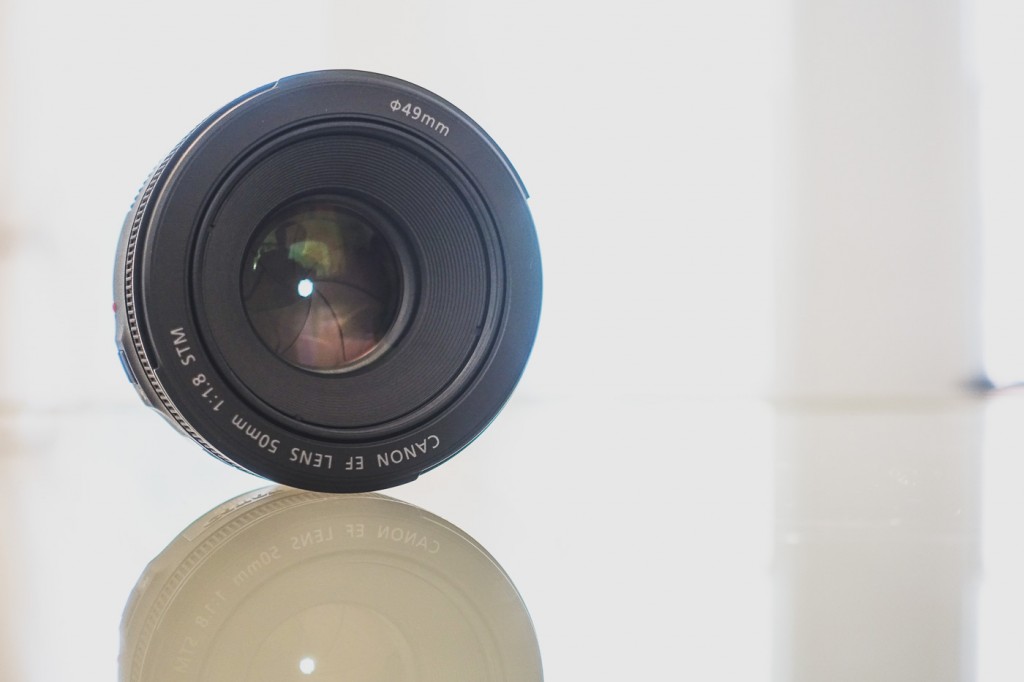
Stock image of Canon EF 50mm F/1.8 II with the blades closed all the way
 Aperture is measured in stops and you will see it marked on your lens in the following values. Let’s say you have a standard kit lens of 18-55mm. That lens generally has an Aperture of F/3.5-F/5.6, which means at 18mm it can open as wide as F/3.5 but at 55mm it can only open to a width of F/5.6.

If you are looking at the popular 70-200mm lenses, they generally come in two varieties, F/2.8 and F/4. The F/2.8 model will allow more light, in this case one stop more, than it’s F/4 counterpart.

Aperture also directly impacts your Depth of Field in your images, especially in longer focal length lenses. We all strive to achieve that creamy background blur and bokeh, and using a low Aperture with a longer focal length lens is how that is accomplished. This is one of the reasons wedding photographers will generally shoot with the 135mm F/2 or the 70-200mm F/2.8 lenses. How your bokeh looks in your images depends on how many blades your lens has. A five blade lens will not be able to make perfect circles, but then again, some people like their bokeh to be more angular, where I prefer mine to be as close to perfectly rounds balls of light. When shooting landscapes, by stepping down the Aperture, you can keep more of the scene in focus and get that beautiful wide shot where everything looks fantastic!

Notice the creamy Bokeh in this shot I took in Monroe, Ga.
 Another thing to keep in mind is that every lens has a “Sweet Spot”, which means the Aperture at which the lens shoots at it’s sharpest. You will need to test your lenses for yourself to find that “Sweet Spot” area, but on most lenses, it’s the area between F/5.6 and F/9.


Janice Mcgregor shot this one with the Canon EF 28-135mm check out that blurry background!
 Understanding Aperture is crucial to become a successful photographer and once you master this aspect of your lenses you will becomes more skilled and intuitive at fine tuning your photography.


Comments/Questions

Sunday, September 6, 2015

Neutral-Density Filters

One of the most important filters you can buy for your camera is called a Neutral-Density filter or ND for short. The purpose of an ND filter is it allows you to shoot long exposures during daytime.

Why would you want to shoot a long exposure during the day? Well, long exposure during the day is how you make an image of say a waterfall look really cool, because you can make the water look as smooth as silk. You can also make clouds look “stretchy” in the sky, which can really make for beautiful images.
Long exposure of a waterfall, look at that silky water
How does an ND filter work? Well, can ND filter contains darkened glass, which reduces the amount of light getting into your camera. I personally have a Tiffen variable ND filter that can reduce the light into my camera by 2-10 stops. This is a significant amount of light blocking capability, and as a result, I can shoot long exposures in brighter light.

ND filters come in dandy when you want to shoot sunrise and sunset shots as well because sometimes during those parts of the day, the light in the sky can be too bright. Now I am sure you are thinking, “Why wouldn’t I just use my lenses narrowest aperture setting like F/20 or F/32, etc?” Well, you can somewhat accomplish this using aperture, but what if the light is too bright and you want a shallow depth of field, then an ND filter becomes very handy to have.

Talmadge Memorial Bridge in Savannah, GA taken with ND Filter
In addition to making a waterfall look silky, you can also use an ND filter to shoot say a lake, because with a body of water like this, you can make water that is rippling look smooth as glass by shooting with an ND filter and long exposure.

When buying an ND filter, don’t go on the super cheap side as those ND filters are usually of cheap construction an they can also cause color casting, etc. On the other hand, you don’t need to buy a $300 ND filter either. I personally bought my Tiffen on Amazon and it was around $90, and I have been very happy with it. If you want to experiment with a new style of photography, get an ND filter and then get out there and have some fun!

Comments/Questions

Sunday, August 9, 2015

Using Aperture for Your Sharpest Images

An item that new students that are also new to photography get confused on is how to get the sharpest images. Often times new students believe that getting the widest aperture lens possible if they can afford it will give them the sharpest images, this is NOT true.

If you ask any of your professors or any other professional photographer, they will tell you that your sharpest images happen around 2 stops below your widest aperture. As an example, I have the Canon EF 50mm F/1.4 USM lens, but I never shoot this lens at F/1.4 as it performs much better sharpness-wise at around F/2.8 on a full frame camera or F/2 on a 1.6x crop body.
Shot on EOS 5D Classic with EF 50mm F/1.4 @ F/1.4
When you shoot with this lens wide open you get very strong halation aka dreamy look with some Chromatic Aberration in your images as well. After the dreamy look diminishes at F/2-F/2.8 you get very strong colors and contrast, which in turn will make your images really “pop”. When using a really wide lens, you don’t want your aperture smaller than F/8 because then diffraction starts to soften them again.

This sharpness is how things apply to prime lenses, which have extremely wide apertures. When dealing with zoom lens, it works a little different, on a zoom lens, the optimum sharpness range might be smaller but they are generally sharpest at their widest apertures of F/3.5-F/5.6 or even F/6.3. Now with a zoom lens as I mentioned the sharpness range is usually smaller but you can generally count on sharp images from the starting aperture to around F/8 or maybe F/10, anything past that and again you get diffraction again.
Shot on EOS 5D Classic with EF 50mm F/1.4 @ F/2.8 notice even the bokeh is better
 Now that you are more informed about using aperture to get sharp images, get out there and make some great ones!

Comments/Questions

Sunday, July 5, 2015

Shooting Fireworks

With the Fourth of July holiday being this past weekend I thought it was a good time to post on a question that many student photographers ask, “How do I shoot fireworks?”

Shooting fireworks can be tricky because first of all, you are shooting at night, which many photographers find difficult to begin with. Second, because your shooting at night, your auto focus will be totally useless as will any automatic modes on your camera. In this post I am going to give you my tips for shooting fireworks and they are pretty much the same that any other photographer will give you.

Check your local weather reports. Even though fireworks are generally used in the U.S. for July Fourth, they are often used to ring in the New Year as well. Even though it is July, there is no guarantee it will not rain as we had here in Georgia this year.
Scout your location. Get to your location early and make certain you will have a clear view to the action. If your fireworks are happening across a bay or lake, you may want to shoot from the opposite side as the reflections on the water look amazing!


Shooting over Boston Harbor photo ©Michael Phillips

As far as gear and settings, you want to shoot fireworks as a long exposure usually as this will give you your best shots and make for some really nice light effects when the fireworks detonate.

1.) A DSLR camera that is capable of BULB shutter mode. Some of you may be asking, what is BULB mode. BULB mode is a setting that allows you to press your shutter button and have the shutter stay open as long as the button is pressed. On my cameras, BULB has it’s own mode on the dial labeled with a ‘B’, but on your camera, you might just have to keep going lower and lower with your shutter speed until you see BULB on your LCD.

A nice, red burst captured at Covington, GA Fourth of July show

2.) Since we are shooting long exposure, you will need a tripod. It is not possible to have long shutter times with hand holding your camera as hand-shake will blur and ruin all your images.
Cable release. This is a cable and button or remote that plugs into your camera and allows you to trigger the shutter without touching the camera. Even with your camera on a tripod if you try pressing the shutter button on the camera, you will blur and ruin your shot. Recommended shutter time is 2.5-4 seconds.

3.) Set your ISO. When shooting fireworks you want to use your lowest possible ISO setting. If shooting a Canon it will be 50 or 100, depending on your camera model, if shooting Nikon it will be 200 most likely. You don’t need to worry about low light, the fireworks are bright when they go off.

4.) Aperture. Set your aperture at around F/11-F22. You want your aperture as narrow as possible to let in the least amount of light and get the best final images. Aperture is something you may have to play with on the fly as your shoot, but start at F/11 and adjust from there.


When shooting fireworks, open your shutter when you see the rocket going up into the air and hold it open as it explodes into it’s colors, then release. If you want to make more of a full light effect, hold it open as several of them burt open in a row and you will capture all of the explosions. If your shots look too dark, then move your aperture open more, say F/8, or if they are too blow out then move to F/16 and try again. Also remember to leave your White Balance on auto and you should be fine. If you are looking to make the sky bluer in the background, then use Tungsten or if you want more orange, then use cloud or shade on your White Balance.

Covington, GA Fourth of July fireworks finale
That’s pretty much it, the rest is trial and error, shoot and adjust until you think they look good. Once you have your settings, I recommend turning off your auto preview as it is distracting and slows your camera performance down. Now go shoot some fireworks!

Comments/Questions

Sunday, May 3, 2015

Keep Down the Noise!

This week I thought I’d write about another subject that I am frequently asked about, noise. First let’s take a look at noise as it pertains to photography. What is noise? Well, noise is the pixelation that happens in your images when you use too much ISO.

Many of the new cameras are capable of high ISO settings, some as high as 256,000 believe it or not. Increasing the ISO on your camera allows you to compensate for low light conditions but is not the ideal way to compensate for it. The ISO setting makes your cameras sensor more sensitive to lighting and your exposure. As you move the number higher, you camera is able to pull in more light from the available light in the conditions. The bad part is when you go too high in ISO, you start getting noise introduced into your images and they start to look sloppy instead of having a nice, fine quality.

Even though most modern cameras can go to large ISO settings, it’s not recommended to do so as the quality of your image will suffer. If you ask most any professional photographer, they will tell you that the maximum ISO that anyone should ever use is ISO 800, as once you get above ISO 800, noise really becomes an issue. Ideally, they will go on to tell you that ISO 50 or 100 is the best to use as it offers the finest quality to the final image. So, how do you keep down the noise if you are shooting in less than ideal lighting conditions? By using a better lens, capable of a wider aperture to allow more light to reach your sensor or by using artificial lighting, such as strobes or continuous, hot light kits.


This image shot at ISO 3200, notice all the noise?

The wide lens option is the best as a lens with a wider aperture will naturally allow more light in. Thins of the aperture of your lens as being the same as the pupil in your eye. When you are in low light conditions, your pupils enlarge so that your eyes can take in more light and allow you to see better. If it’s a bright, sunny day your pupils will become very small as you don’t need as much light allowed in to see. Aperture works the same way as your pupil, when you have a wide aperture lens, say an F/1.4 your lens is opened up allowing more ambient light into your sensor to make the exposure. The down side of wide aperture lenses is that they are generally expensive. Take the most popular lens from one of my earlier posts, the 70-200mm. As I mentioned in that earlier post the 70-200mm from Canon comes in two apertures, F/4 and F/2.8. The F/4, which I currently own is a fantastic lens and takes beautiful images with outdoor light, but if I needed to shoot indoors, say at a concert or indoor sports like basketball the F/2.8 will work better because it can open wider than the F/4 and let more of the natural light in that environment into my sensor. The difference in price is significant, with the 70-200mm F/4 L lens costing around $800 and the 70-200mm F/2.8 costing around $2,100.

Same image shot at ISO 100, notice the fine quality?

As I mentioned earlier in this post, the other option to prevent noise is to use artificial lighting such as a Speedlite external flash, or full blown strobes or even hot lights. These will allow you to keep your cameras ISO down really low if the lights are powerful enough to compensate for the poor natural lighting. Flash is not ideal in most low light conditions such as concerts or indoor sports as the flash is distracting, which is why if you are at a basketball game or watching one on TV you will notice that most all of the sports photographers there will have no flash but will instead be using that big fat F/2.8 70-200mm to get the shots they need for sports magazines and websites.

Now, since most of the AI family reading this post are students, I am assuming you are not rich enough to buy all your lenses at F/2.8 or wider as it is very costly. I would recommend to you that you invest in one expensive F/2.8 zoom such as the 70-200mm and buy the rest of your lenses in whatever aperture you can afford and use. If you do want to buy a good 70-200mm F/2.8, then you can always rent one from www.borrowlenses.com or from www.lumoid.com. I personally love Lumoid as they let you try before you buy and if you want to own that lens, they will split that cost up over three months to make it more affordable. I am not certain Borrow Lenses offers the same option as I have never used them but I know Reuben has and he can probably best answer that question.

Now get out there and make some great images.

Comments/Questions

Sunday, April 26, 2015

Should I Only Buy Name Brand Lenses?

Another one of the questions I myself and many other photographers get from students is this one, “Should I only buy Name Brand lenses”, i.e. Canon, Nikon, Sony, etc.

To be honest there are no straight yes or no answer to this question. Some of it is personal preference, some of it is your budget. I am a Canon shooter and I love my Canon gear, but do I only buy Canon lenses? Absolutely not! Why, well for one thing, I have an I.Q. higher than 10 points and another, I am NOT rich!

In the past you would usually hear the old adage you get what you pay for but this is no longer the case. Over the last few years third party lens builders have gotten better and better at putting out quality equipment. Tamron, is in my humble opinion, the King of third party lenses, outside Carl Zeiss, who’s lenses are priced so ridiculously high, for manual only lenses, I will never own one.

I consider Tamron the King of third party lenses because I have personally never had a bad Tamron lens nor read any bad reviews on any of them. I have had Sigma lenses that threw all kinds of weird errors when I tried to use them and the image quality had been really weak on some of them I have used but I have read that lately Sigma is getter really good as well. Just like Canon or Nikon, both builders have their low end lenses and their high end lenses. For Tamron, their high end ones are the SP series, and many photographers compare Tamron’s SP series as being nearly as good if not sometimes better than Canon “L” series glass. Image quality, build quality, all on par or better than Canon’s “L” glass, the catch is, Tamron’s SP lenses cost WAY less money.


Monarch butterfly shot with Canon 70-200mm F/4 L USM
What is the most popular zoom lens in photography? The 70-200mm lens is by far used by more pros than any other zoom lens every made. Why, well it has what is known in the industry as the “sweet” focal lengths. 70-85mm is popular for portraits as is 135mm and having a max of 200mm is good for most all around shooting, sports, events, etc. Now Canon makes four versions of the 70-200mm “L” series lens. There’s the 70-200mm F/4 L with or without IS (Image Stabilizer) and the 70-200mm F/28. with or without IS. These four lenses vary in price from $800-$2,100 for the new F/2.8 IS II. As most people will tell you, if you want the best lens, go with the F/2.8 with or without IS depending on your wallet. The reason is the faster F/2.8 lets in more light so you can use it in lower light shooting, like if you specialize in shooting bands at concerts or bars as those are very low light situations.

Not everyone wants to spend $2,100 for a single lens, enter Tamron. Tamron offers the same 70-200mm F/2.8 Di VC (Di means fits full frame as well as crop bodies, VC means Vibration Compensation, same as Canon’s IS) for $999-$1,499 depending on who you buy it from. That is considerable savings for the most popular lens in one of the best apertures. I currently have the Canon 70-200mm F/4 USM but plan to pick up the Tamron 70-200mm F/2.8 Di VC as one of my near future purchase.

Hopefully, this article will help you decide where you want to put your money when it comes to lens purchases. Now get out there and make some great images!

Comments/Questions

Sunday, November 16, 2014

Which Lenses are Better, Primes or Zooms?

    Another question I have frequently asked by other students and even members of my photography club is which lens is better, Primes or Zooms?

    This is an interesting question and can stir some debate. Primes are lenses with a fixed focal length, such as the Canon 40mm STM Pancake lens or the Canon or Nikon 50mm lenses, known as the “Nifty Fifty”. These lenses are not able to zoom in and out but they are extremely power lenses to have.

    Advantages of the Primes is they will be of a wider aperture than the zooms. My 40mm lens is F/2.8 and my 50mm is F/1.4, with the wider aperture, I can use these lenses in much lower light levels than I can say my 28-135mm F/3.5-5.6 lens, which covers the same two focal lengths. There are today zooms than can do F/2.8 but they are very expensive and I don’t want to get off track here.

    The other difference with Primes is, since they have a fixed focal length you have to get closer when shooting something. A lot of photographers like to use the “Nifty Fifty” for portraits, but you cannot shoot a portrait of someone from 10-12 feet with a 50mm as you will pick up too much background. Move in to around 3-6 feet and you will get a great portrait, depending on the style you are shooting for. The Prime lens will generally have a sharper focus to it, even at the wide end of it’s aperture and will cost a lot less money than a zoom.


                                    My mailbox shot with the 40mm STM from around 2-3 feet

    Zooms do have their places, however, such as shooting at an outdoor event like a concert or fair where you cannot always get close to your subject and really need or want to get the shot. In these situations, yes it’s great to have that handy telephoto zoom lens to get in nice and tight to the subject without risking yourself or interfering with anyone else, say law enforcement at an accident scene. Zooms have come a long way and like a said, a nice 70-200mm F/2.8 is one of the most popular lens from both Canon and Nikon, but it’s also got a hefty price of up to $2,500 where you can get a good prime generally for $140-$700.

                           My mailbox shot with the Canon 70-200mm F/4 L USM from around 20 feet

    So, do both lenses have a place in your camera bag, absolutely, and as a general rule, my Primes and Zooms will usually sit in the bag peacefully without fighting too much. I do challenge you to use your primes more, many photographers tend to get lazy or they are shy and don’t want to get close to their subjects. I encourage you to break out of this mode of thinking and get close to your subjects, as long as you can do so without getting hurt or killed in the process. I’m not telling you to walk up to the lion at the zoo and get in his face with your 50mm, but next time you are shooting people, say on the street, use that 50mm and get up close and personal.


Comments/Questions

Sunday, October 26, 2014

Shooting in Low Light

Last Sunday I wrote about how to get yourself out of Auto mode on your DSLR. This week I am going to touch on shooting in low light situations where you cannot use flash.

Shooting in low light can be a challenge for any photographer and many of you will be asked to do it at some point in your photography career, such as shooting bands in bars or night clubs and everyone knows how poor the lighting is in these places and generally you cannot use your flash here at it is too distracting. You also cannot use Auto mode on your camera due to all the variances in the room, your camera will constantly be confused when trying to set the exposure due to stage lights and other things going on in the back ground.


Low light photography such as this is tricky but not impossible and it’s a matter of having the right gear to get the good shots. The following information will help you accomplish your mission.

Use the fastest/widest lens Aperture-wise that you can afford. A lens such as a 50mm F/1.8 to F/1.2 will go a long way in shooting in this situation, plus they are great for group shots of the band and portraits if you move close.


Use a camera with a higher ISO range. I know last week I told you to keep your ISO as low as possible but in this case, you WILL need a higher ISO like 1600 or 3200 to get the images to come out. The thing to remember here is newer cameras are better at high ISO and although I am a Canon shooter, Nikon's dominate here, check any review on Youtube.

Move around. You are not going to get the shots you need unless you are willing to move around. Remember, you are shooting a band so you will have to get around the fans or people dancing so don’t be afraid to move up close to the stage to get the good shots.


Get the candid shots. Don’t be afraid to stick around and get shots of the band after the show or during an intermission. Some of the greatest musician or band photos are of the artists just relaxing after the show either backstage or on their bus. The shot of the bassist holding their bass and relaxing or even practicing their chords before the show can be some really great images.
Get some good group shots. Many times when a band hires you to shoot a show they are going to want to use the images on their web site or even as the cover of their new album. Make sure you get a few good shots of the band together before or after the show.


Shooting in low light can be very challenging but can also be very rewarding. Once you master this type of photography, you are well on your way to becoming an accomplished professional. I want to thank my good friend Jessi James for donating these images showing what can go right and what can go wrong. Jessi shoots band quite frequently, so she has mastered shooting in this low light situation. Jessi is a classmate here at the Art Institute working on her Bachelor's in photography.

 Now get out there and shoot some fantastic images. Give low light photography a try and feel free to post your comment or questions and post your images here or on the Google + Page.


Comments/Questions

Tuesday, August 5, 2014

Get More Confidence with Outdoor Flash Photography

My current class, Portraiture, has been seriously testing my skills with specific instruction and although I am feeling more confident about using my strobes I am still facing some issues on how much knowledge I still lack in problem-solving photography obstacles.  I have been scouting locations and scheduling extra shoots not only for added practice but also to cover myself for when I make those inevitable errors like forgetting to reset a setting--I have actually done a few shoots where my Auto-Focus was set to manual and I never caught it until I caught previews of noticeably-blurry photos--no one else noticed it either, but I still felt so disappointed in myself.

In an effort to get better results with my on-location, outdoor shoots using flash I had to do some extra research to help me understand what it really means about strobes being controlled by aperture and ambient light controlled by shutter speed and how to effectively use flash photography outdoors during daylight hours.  I recommend reading the entire article here but I will highlight the points that I found very informative.

An Introduction to Outdoor Flash Photography


If you're like me and knew so little about the field of photography, the challenges these classes offer to get us real-world experience should be accepted as a means to acquire or hone our skills.  Many of these assignments will provide us opportunities to venture out of the studio where we face even more elements for consideration.  Good time management is very important as well as understanding your environment.  The studio gives us greater control but how do you set up your strobes during the day..?  Using ambient light and likely a reflector card would be the first go-to, maybe even a speedlight, when shooting outdoors during the day, but effectively using flash photography outdoors can be both an invaluable skill and fun to experiment with.  This Nature photographer here cannot resist the urge to be shooting outside so it was important for me to learn how to be able to combine the two for portraiture -- Double bonus!


The first problem we face is balancing the mixed light.  You have natural ambient light and flash to consider so make time to do a custom white balance using your gray card.  

Next, since we cannot control the sun we can effectively control the strobes to light the scene.  It is often noted that we should avoid shooting when the sun is high but rather shoot early or shoot around sunset.  Sometimes we cannot avoid it so the best approach when using strobes is to first set the exposure on your camera to match the available light.  You will need to keep an eye on your shutter speed so that you are metering for an exposure that is within your sync speed.  This will help you determine the aperture at which to meter your strobes.  It is important to take test shots beforehand to obtain the correct exposure balance before you start shooting because natural ambient light can change pretty fast.  You will also need to determine the quality of light you want to create by using modifiers appropriately and also getting creative with how you use them such as for bouncing light for use as fill light as you will see later when discussing cross lighting.

 Depending on how much you want to over- or under-expose the background will determine the level of drama you want to create.  This is where we learn what it means about what shutter speed and aperture control.  Changing the shutter speed slower than sync speeds typically around 1/200th will control the exposure of the background.  Slowing it down will brighten up the background thus lessening the contrast and opening up the shadow regions.  The aperture will control the subject and how over- or under-exposed it is.  Say you metered for f/8 @ 1/200th and you are ok with the illumination of the background but you want to emphasize your subject by making them brighter you would open up the aperture to f/5.6 or f/4 or something similar and let more light in.  If you wanted them a bit more under-exposed you would stop down the aperture and close it down to something similar to f/9 or f/11 while the background remains constant.


Something to consider about light placement is outdoor cross-lighting.  This is where the lights face the direction of the sun and the model is captured in between--something comparable to shooting under the mid-day sun with no shade.  It is highly recommended to have the sun illuminating your subject and your strobes fill their shadowed side or you will end up running into issues with them squinting.  Follow the same instructions for metering and checking the desired exposure.


These tips will help you achieve more effective outdoor lighting and  increased success when using your strobes outside.  As with pretty much everything we learn, practice does indeed make perfect and hard work almost always pays off.  Let your passion and curiosity inspire you to be the best photographer you can be.  Do you have tips about flash photography outside or questions I might be able to answer?  Please leave a comment below!  


Works Cited

Eftaiha, Diana. "An Introduction to Outdoor Flash Photography." photography.tutsplus. Envato Pty Ltd., 15 Dec. 2010. Web. 8 Aug. 2014. <http://photography.tutsplus.com/articles/an-introduction-to-outdoor-flash-photography--photo-4272>

All images are my own and from my recent experiences using my strobes during the day.

Sunday, March 30, 2014

Sunday Spotlight On: Getting It Right On Site


My first day in “Art School” as my daughter calls it, I was given a camera and told to go shoot and come back. I started off at The Art Institute of Raleigh Durham and I thought that I was the best student photographer amongst my peers. After I arrived back in the classroom and loaded the photos onto the screen I was mortified by the gasps and the critique that I had received.  I didn’t know what was wrong! I mean certainly my images were on the level of a professional who charges $1000 an hour. In actuality I was so wrong! The images were blurry, camera shake, white balance was off and just all around terrible! One thing that I will never forget is a Professor of mine telling me that if I do not know it, then to cheat. What?! Yes, cheat. She advised me to write down almost everything from the white balance, aperture and shutter speed and always refer to it when I am shooting until I no longer need it. Today there are tons of websites that offers the same thing.

Courtesy of lifehack.org
Photoshop has spoiled a lot of photographers out there. Making things too easy to edit in post production limits some photographers to "get it right on site." Proper lighting is essential to a good photographer's practice. I could only imagine photographing a session and you let your clients view the photos on your camera and they are all wrong. Imagine what they will think if they see themselves too warm or too cool on camera.

Courtesy of lifehack.org
F-stops are numbers that all real photographers must know. Don't be caught without knowledge of what each one of these mean! These numbers depends on your DOF and how much light your camera is letting in.

Courtesy of lifehack.org


As students and professionals we are always learning every time we pick up our camera to shoot. I will admit that if I am in a class that is a studio setting and then I go back and shoot outside of the studio I have to think for a minute on what my settings should go back to. I have made it a habit for me to daily check my settings on my camera and take a shot in the conditions that I am in and time myself on how fast I can get to the right settings. I like to keep my skills sharp because I never know when I might come across the one event that I need to capture but I missed it fumbling with my camera settings.

Happy Shooting!

I am your Funday Sunday Ambassador!


Work Cited:
Life Hack. "The Ultimate Photography Cheat Sheet Every Photography Lover Needs." Life Hack. ND. Web. 29 March 2014.

Wednesday, October 2, 2013

Photographing a Moving Target

Good Morning, AIPOD World! This past weekend I had the privilege to document the first annual retreat for a non-profit organization called Girls with Guts. These girls really do have a lot of guts to deal triumphantly with the physical ordeals they live with on a day-in and day-out basis.

One of the activities they participated in was a zip-line over a deep ravine. I stood down below in the ravine and tried to photograph each of them as they traversed it in a 16-second trip. Using my 300mm lens with my file size on Camera Raw so I got the max amount of digital file, I focused on them at the starting point, and tried to follow them across, turning as they passed overhead. It sounds much easier than it was. They started in the woods, up a stairway in the trees. This photographed best at ISO 1250 at f/19 at 1/125 sec. By the time they were overhead the camera was metering f/19 at 1/750 sec. Then they went back into wooded area and the metering changed back to f/19 at 1/125 sec.
photos by Connie Rohne
So how do you manage your camera in a situation like that. Believe me I was desperate enough to try “P” for “program” but those results were not pretty. What were the main problems? First, my camera could not decipher where to focus quickly enough, when I was set on auto focus. So that meant I had to be able to manually focus-quickly. Second moving from dark treed areas to clear sky overhead was an extremely drastic light change. I would have loved to change my ISO from 1250 to 100 when overhead, but that was impossible in an 4 second time frame, and then changing back again for the other side.

I tried the AV (aperture priority) mode, thinking I could keep my shutter speed consistent and change my aperture to control the light getting in. Setting my aperture at 4.0 was, however, a great recipe for out of focus images with subjects moving so quickly over me. The lighting concept was right, but there was too much variation in light. Also I needed the higher ISO to get more detail in the dark areas in the trees. Overhead the aperture setting wouldn't allow for enough change to control the light getting in at that ISO.

So back to M, manual, my mainstay.  I could focus with one hand, and dial my shutter speed with the other.  My subjects were traveling about 500 feet in 16 seconds, or just over 31 feet per second. Setting my aperture to f/19 gave me a good depth of field to catch them in focus. I really needed a high shutter speed to freeze their movement. I found the 1/125 sec gave me a nice crisp image. That took care of both ends of the zip line in the wooded area. When they passed over my head 1/125 second was totally blown out, you could barely see the shape of a person in the brightness. Dialing my shutter speed up as they came out into the skylight to 1/500 or 1/750 gave me beautiful blue skies and still enough details in the shadows on my subjects to capture great expressions.
This was a new challenge for me. Actually this was a week of new challenges for me. I hope to share some more of them with you next week.


Have a great day. Go out and try something new and challenging!