Sunday, August 28, 2016

Focus Screen Part 2

In my last blog post I talked about the Focus Screen on your camera and what it does. This week I am writing part two of this article on how to replace or clean your Focus Screen properly so that you can always have a clear viewfinder to look through.

To remove your Focus Screen for cleaning or replacement, you need a Focus Screen tool. This is a special, plastic, tweezer-like tool that can grab the Focus Screen by it’s little tab and remove it safely. If you take off your lens and lay the camera on it’s back, look at the top of the lens opening and you will see a small metal tab. Flip that down carefully with your finger or tweezers and that releases the frame, and there the Focus Screen is.


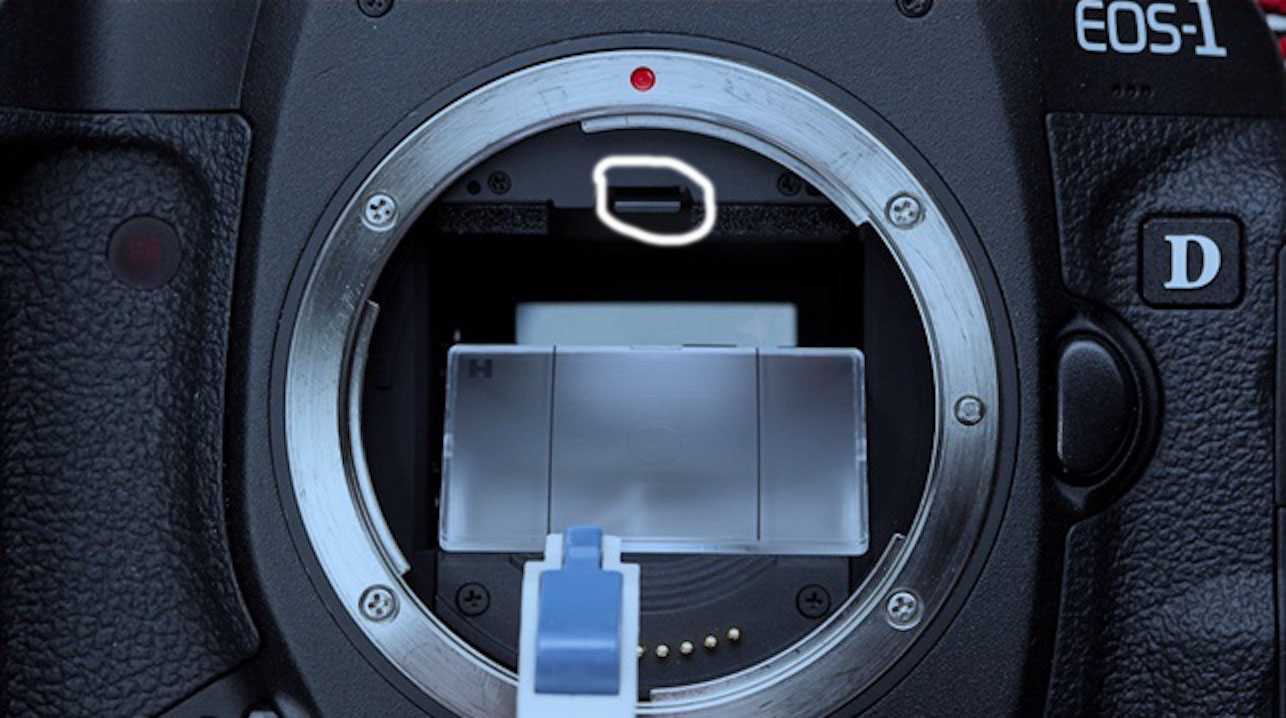
Focus Screen release tab is circled in white.

Once you have flipped the Focus Screen frame switch, the frame drops down on it’s own and you can see the Focus Screen. Using the Focus Screen tool, grab the Focus Screen by the tab and gently lift it out of the camera.
New Focus Screen and grabber tool in the plastic box
 To clean the Focus Screen, Canon recommends you use a Rocket Blower first to see if you can blow any of the particles off the Focus Screen. You can then re-insert it with the tool, close the frame and look through your viewfinder to see if you were successful. If not, remove the Focus Screen again and you can try cleaning it with soap and water.

Prepare some warm water in a small dish or cup, you can use Distilled water but it’s not required. Add a small amount of dish soap like Dawn or whatever you have in your kitchen. Put the Focus Screen in the solution and let it soak for a bit, remove it from the solution and gently brush it with a horsehair brush, like a small paint brush, new of course, that people use to paint models.

Next, use your Rocket Blower and blow the Focus Screen dry, never use your breath. You can use compressed air, but make sure you don’t freeze the Focus Screen by blowing it too closely with the compressed air. Once you feel it’s clean, and dry, put it back into the frame and snap the frame back into place. Never touch the Focus Screen with your fingers, other than by the side edges as the oils in your skin will make a mess of the Focus Screen and that oil is pretty much impossible to get off again according to Canon.

Rocket Blower for cleaning sensor and Focus Screen

Check your viewfinder again, if it’s clear, you are good to go! I sometimes try to clean my Focus Screens, but I have bought used cameras and had the Focus Screen just so incredibly dirty that I just replaced it. You can buy new Focus Screens from Canon, Nikon (if you are a Nikon shooter), B&H, Adorama, or Amazon. When you order a new one they come in a nice plastic tray assembly with a snap close lid and the tool comes with it. After I remove my old one and swap it out, I put the old one in the tray and store it in a drawer just in case I need an emergency spare.

Now, if you don’t have the stomach to clean the Focus Screen, you can easily just replace it yourself or take your camera to a camera shop to do it for you. I will warn you that depending on where you live, it can cost you upwards of $200 to have it changed. If you are a CPS member, Canon will clean it for free along with your sensor once a year, but you have to ship it to them and be without your camera for a few days.


Comments/Questions

Sunday, August 21, 2016

Focus Screen Part 1

This week’s blog post I wanted to write about a specific part of the camera system that you may or may not be familiar with, the Focus Screen.

The Focus Screen is a small piece of flat, translucent material, either ground glass or a fresnel lens. It is located inside the front of your camera where the lens mounts and help you acquire focus and frame your shot through your camera’s viewfinder.

Canon Eg-A Focus Screen
 There are various types of Focus Screens for most cameras and they can be either etched or non-etched. There are even Focus Screens which are made specifically for using low light lenses.

Some cameras have plain Focus Screens and others have etched ones that denote the focus points and even have a grid for maintaining your “Rule of Thirds”. Many of the newest mid-range and professional DSLRs have a plain Focus Screen with a monochromatic LCD overlay that reveals the focus points when you depress the shutter button halfway.

One of the interesting things about your Focus Screen, aside from the fact that many people do not realize their camera has one, or that it’s easily replaced, is the fact that if the Focus Screen picks up dirt, many photographers think it’s their sensor that’s dirty when that is not the case. If you are someone like myself that has an OCD thing about even the smallest spec of dust in my field of vision, the Focus Screen can be a source of annoyance.


Image of a dirty Focus Screen, courtesy of Ken Rockwell

Have you ever looked through your viewfinder and noticed little black specs or even tiny black strings? Well, chances are if you have seen this, it is your Focus Screen that is the culprit and not your sensor. Especially if you see the dirt, but it does not show up in your photos.

Cross Section of a DSLR, Number 5 is the Focus Screen
Focus Screens can be a pain to clean and there are specific methods to do so, which I will go into in my next post. For now, either try to ignore the dirt in your field of view if you can, or go on-line and order another Focus Screen and replace your old one. You can generally buy new ones for around $20-$35 a piece, but look up which model your camera came with originally and buy the same one. Most all Canon cameras come with what’s called the Precision Matte “Eg-A” Focus Screen and the new one will come with a special tool to remove the old one and put in the new one. Whatever you do, do not touch the Focus Screen with your fingers. My next post will be on how to remove and replace your Focus Screen as well as how to clean it PROPERLY.


Comments/Questions

Sunday, August 14, 2016

Great Plugins


One of the items that can come in handy for your Post-Production is plugins or add-on software for your Photoshop and Lightroom. These can be handy little programs that can give your images a little extra “pop” to make them really stand out.

The ones I want to talk about today are the Creative Kit 2016 pack by Macphun software. Macphun makes software for Macs only and their plugins are very good and can really take your images to the next level.

Creative Kit 2016 comes with six programs, which are Intensify, Tonality, Snapheal, FX Photo, Focus and Noiseless.

Intensify will help with powerful Structure, Sharpness and Details using Pro contrast and comes with dozens of built in image presets.


Tonality is a Black & White photo editor, which allows you to reimagine your monochrome image editing with hundreds of presets, layers,unique digital controls, authentic grain effects and more.


Snapheal allows you to remove unwanted objects and strangers from your photos. You can cut any odd or excessive details. It also features a Clone & Stamp tool to help you replace them with something nice. I like this one as I think it does a better job at removing objects than Photoshop alone.


FX Photo Studio allows you to experiment with styles and looks for your images. Use the large selection of filters to create customized, unique images, you can combine or apply them selectively for some really “special” images.


Focus allows you to add Pro lens effects without the expensive gear. Use smart blur controls and powerful lens effects, including adding your own bokeh in Post Production.


Noiseless will get rid of digital noise and preserve details in your structure and save your night shots by turning them into crispy & clear images. Have Noiseless work on your images pixel by pixel to make them smooth and vibrant instead of deleting them because of noise.


You can buy the entire Creative Kit 2016 on sale for $129.99, marked down from $339 and you can buy it in installments of $25 over 5 monthly payments. If you search the web you might be able to find it even cheaper, I got a deal through Stack Social and I paid only $53 for the entire kit and the nice thing is you can install it on as many Macs as you want with one license.

One final note, some people Love the new “Photos” app in OS X that replaced Aperture, some people hate it and want Aperture back. I prefer Aperture myself and bought it years ago so I will always have it. But if you do like using the “Photos” app for even minor post production, Macphun has updated Creative Kit 2016 so their plugins will even work in “Photos” as “Extensions” or plugins in the Apple world.

All of these plugins will install into Aperture, Photos, Lightroom, Photoshop and Photoshop Elements so you can use them on whichever of these programs is your favorite.


Comments/Questions