Sunday, March 12, 2017

Good Glass is More Important

One of the things that new photographers battle with is gear purchasing. Many photographers on a budget, especially while in school have a hard time deciding on how to buy the gear they need.

One of the primary things new photographers needs to remember is although it’s nice to have the latest, greatest camera bodies, it’s not as much of a necessity as high quality glass. Whether you are a Canon or Nikon shooter, each company has different varieties of glass with different levels of quality, but this is where you should be spending your money as a new photographer. This first image I shot on Sunday March 5, 2017 at the Folds of Honor QuickTrip 500 at Atlanta Motor Speedway. I did NO post processing, this image is straight out of my camera using the older Canon EF 100-400mm F/3.5 - F/5.6 L USM lens.


Camera bodies get updates almost every year, but lenses change less frequently and when it comes to camera bodies, unless the new model has some new technology that you absolutely need for your photography, you are better off spending your hard earned money on high quality glass. The reason for this is although Canon’s L lenses are really expensive, you can keep using the glass for a long time to come as it doesn’t become majorly outdated in just a couple years.

Even though Canon released a newer 24-70mm F/2.8 Mk II L IS or a new 85mm F/1.2 L USM, many pros are still shooting with the original models as they still take fantastic photos. I know when you look at say the 70-200mm F/2.8 L USM Mk II can sell for $2,000, you can often find the original one used in great condition for $900 and it will still work and make great images for years to come so you are going to get more out of that lens than you will $900-$2,000+ for a new camera body. This second image of Dale Jr's car being pushed from the garage to the pit area for the start of the race I captured with my 50mm F/1.2 L USM lens and again, NO post processing other than the lens profile correction in Lightroom.


There are many sites where you can buy good or even great condition previous model L lenses from reputable companies like KEH, Adorama, or B&H. If you are up on your lens knowledge you can also get good deals on Craigslist or eBay as well. If you want to try out a lens before you buy or be able to use one before you can afford to buy you can go ti sites like Kitsplit or Lumoid.

So, remember, before you spend that tax refund on a new camera body, look at buying newer, high quality glass for your current camera body and you will be amazed at how much better your images can be with high quality glass.


Comments/Questions

Monday, January 30, 2017

New iPhone 7 Plus Portrait Mode

Back in the fall of 2016 when Apple announced the iPhone 7 and 7 Plus they also talked about a new camera mode for the iPhone 7 Plus only, called Depth of Field Portrait Mode.

Using this new mode on the 7 Plus’ camera, you can shoot a portrait and have the great “bokeh” effect for the background while the subject is in sharp focus. At the time it was mentioned that the new mode would only work when the iPhone’s camera recognized a face, so it would only be useful for human portraits. I am happy to say that now that Apple has actually released this feature via software update that it actually works quite well even on objects.

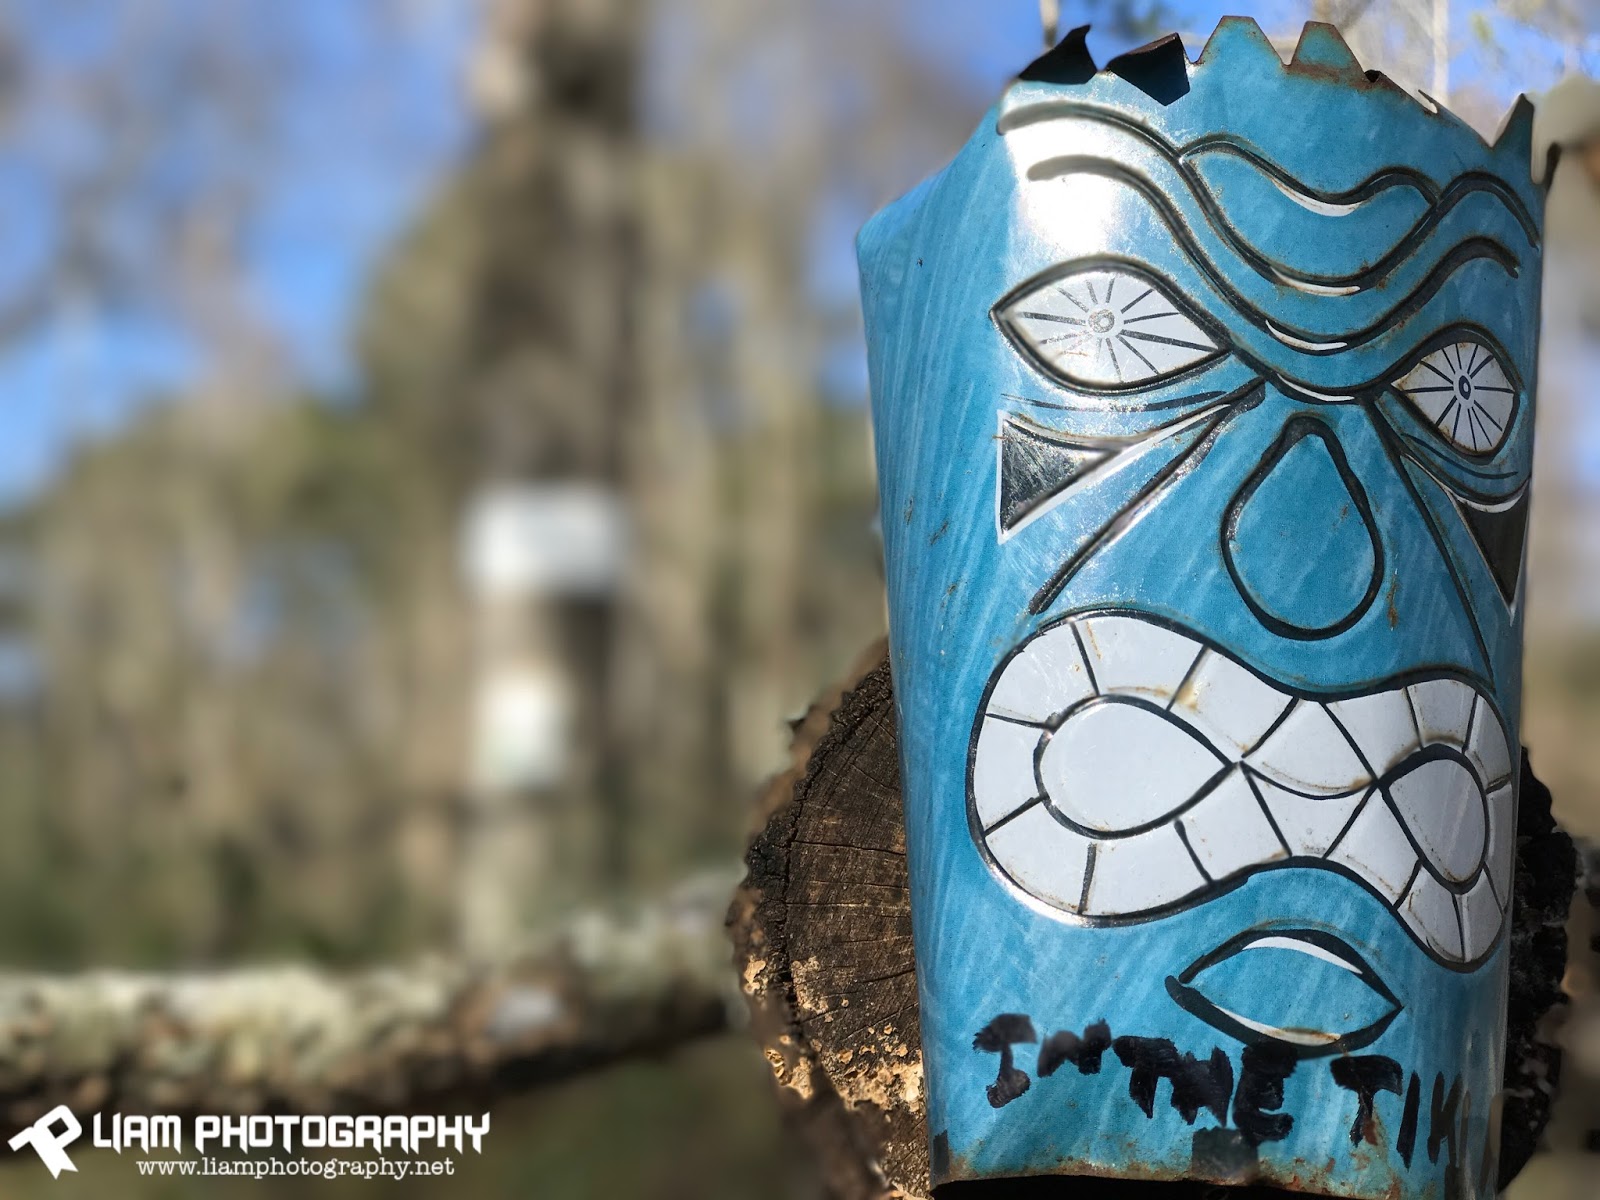
Tiki character shot with Depth of Field Effect on iPhone 7 Plus

This past weekend I went out shooting with my photography club and I decided to try out this new Depth of Field Effect mode on my iPhone 7 Plus. During our photowalk we went to Constitution Lakes Park in Dekalb County, Ga. A man that did volunteer work at this park found a pit full of trash and decided to start using the trash to make art.

One of his pieces is a Tiki character attached to a fallen tree and when I spotted it, I thought it would be an interesting subject to test the new portrait mode on the iPhone 7 Plus camera system. As you can see in my attached photo, the new mode does work quite well even though my subject is not an actual person.

Fire Hydrant shot with the Depth of Field Effect in Sparta, Ga
 On Sunday I was out shooting for my Forgotten Pieces of Georgia series and stopped in Sparta, Ga to shoot some video of this small town which is turning into a ghost town. Before filming, I spotted a rusty old fire hydrant and decided to test the iPhone 7 Plus camera again and again it worked quite well with the bokeh effect.

Last weekend I was also visiting the family of my girlfriend Janice and while there, I used my iPhone 7 Plus to snap a photo of their hummingbird feeder using the new portrait mode.

Hummingbird feeder shot on iPhone 7 Plus
 If you have an iPhone 7 Plus, I encourage you to give it a try and see what kind of images you can create. It cannot replace your DSLR, but you can make some interesting images with this new tool in your bag.

Comments/Questions

Sunday, January 15, 2017

Use Lightroom to Enhance the Sky

This week I wanted to write about a Lightroom technique to enhance the sky in your photos. Sometime when you are out shooting landscapes you might get a fantastic shot, but when you get home to post process, you find the sky is kind of blown out, looking more white than blue with clouds. How can you fix this and not end up scrapping the image all together, or having the shot look ho hum, enter the Gradient Tool in Lightroom.


Blah sky with some clouds
 The Lightroom Gradient tool in the Develop Module can really help improve your sky, especially if you capture a shot at a lake or river and you can see the blue of the sky and white of the clouds in the reflection on the water. Select the Gradient Tool, which looks like a rectangle and then take the little + crosshair and hold it at the top of your image, now hold down the shift key, which will make your pull down go straight and drag to the bottom of the sky portion.

Some blue added in with Gradient Tool
Next go to the Adjustments for the Gradient Tool and use the Highlight slider or Exposure slider and pull out more of the details in the sky. Generally the Highlight slider will get the job done and I tend to always shoot my landscapes especially with my Light meter in the camera about two ticks before the mid center tick mark. Then, when I edit, I use the Highlight slider and the Shadows slider to pull in more details in those areas, but sometime, you need just a bit more to get that nice looking sky, and thats when the Gradient tool comes in handy.


Finished image
You can even take your adjustments when you are done and save them as a custom adjustment, name it, and then use it over and over again. Lightroom is without a doubt one of, if not THE best post processing software on the market for photography, which is why so many Pros use Lightroom worldwide. Now one thing to remember is shoot in RAW, so you can actually get those details to pull out in Post Processing. You can use Lightroom to work JPG files, but those file types don't allow nearly as much improvement without the file going to crap in the process.

I know what you are thinking, "But RAW files are so BIG"! They are, but memory cards are fairly cheap these days and if you are shooting landscapes, you don't need a large FPS like you would for sports. So, next time you get a nice landscape, but the sky is blown out, don't despair, just grab that Gradient Tool and work some "magic".

Comments/Questions

Monday, January 2, 2017

Peak Design Does It Again!

This week I wanted to write about a new camera carry system from the good folks at PeakDesign. I have been buying PeakDesign’s items for a couple years now, they came out with a nice camera carry system called the Capture Pro Clip. This unique system allow photographers to attach their cameras to their own belt or backpack straps and have a quick disconnect via a tripod style plate so you could remove the camera, shoot and snap it back into place when done!

Capture Pro Clip System
I bought two of the Capture Pro Clips systems and I have not regretted it once! They are high quality systems, made of metal and hold your DSLR securely, I have worn mine while riding my motorcycle and had no issues with it coming loose and losing a camera.

PeakDesign has also come out with their own camera bags, which are weather-proof and comes with a unique Origami-Inspired compartment separators. They also have their own camera cover and straps for carrying your camera.

Capture Pro in action

Today, I am writing about one of their new items, their Anchor Links system. This system allows a photographer to use their favorite camera strap and have high strength, quick disconnects, which make it easier to have multiple cameras and one strap out in the field! The Anchor Links systems works with ANY camera strap that has ends that are 1cm wide or less, which is pretty much the industry standard since the strap has to attach to the two metal slots on the camera itself.

The Anchor Links system gives you a strong, quick disconnect system for your camera strap so if you are like myself and have several cameras, you can quickly move the strap from camera to camera. When I go out on a shoot, I usually carry at least two cameras so I don’t have to change lenses in the field and risk getting dirt on my sensor. By using the Capture Pro clip system in conjunction with these Anchor Links, I can use the same strap with both cameras!
Anchor Links System

Peak Design’s patented system allow you to attach Anchors to your camera’s strap tabs and leave them on all the time. They are small and non-intrusive so they don’t add any extra weight to your camera, but when you want to attach your favorite strap, just slide the Anchors into the Link on your strap and “snap” they lock into place! When you want to switch cameras, just push in on the Anchor and pull down and the Anchors release and the strap can then be added to another camera!

Another nice thing is, the small bungee cord-style Anchor straps that attach to your camera will change color over time as they weaken from use to let you know it’s time to replace them. I have had my system for a while now and no issues at all and I carry some heavy gear like my Tamron SP 150-600mm Di VC USD lens for wildlife and this lens weighs a whopping 4.42 pounds!

Anchor Links System in use on a DSLR
I had been toying with trying to make my own quick-disconnect system for my favorite camera strap, which happens to be my gel-padded Canon CPS strap, but Peak Designs beat me to the punch. Best of all, the Anchor Links system only costs $19.99 and extra Anchors are $9.99 for a set of four, enough to attach to two different cameras!

So if you want a way to quickly and securely use your favorite strap on two different cameras or just remove your strap when shooting in your studio, I highly recommend the Peak Design Anchor Links system!

*All images belong to Peak Design.

Comments/Questions

Sunday, December 18, 2016

Focus Stacking

 This week I wanted to write about a photography technique that I recently started playing with that I learned during my recent View Camera Theory class.

Every seen a photo in a magazine ad for a new watch or other small item and wondered “How do they get the entire item in such sharp focus?” They use a technique called Focus Stacking so that every part of that Rolex is in razor sharp focus, from the numbers and hands on the watch to the band attached to it.

Focus Stacking is where you set your camera up on a tripod so you are nice and stable, then you shoot the product or item, changing your focus point but not moving the camera or changing the focal length.

This is 5 captures of the same scene but with different focus points.
 By shooting multiple captures on the product with a different part in focus each time and them combining them in Photoshop, you end up with a finished image that had every part of the watch in sharp focus with high detail.

Once you have captured your images, import them into Lightroom and then go to the Develop module and activate your Len Profile Correction. Once you have that done then select all of the images in the group that you shot and select the Photo menu item, then go down and select “Open as Layers in Photoshop.”

Once they are opened in Photoshop, select all of the Layers at once, then click the Edit Menu and choose Auto-Align Layers. Then when that has completed, click the Edit menu again and choose Auto-Blend Layers. When the process has completed, you will have a single new image where everything is in sharp focus and with high details.

All 5 shots from above combined into this Stacked image

Now all you have to do is save the new image and you are done. Focus Stacking is a lot of fun and can give you fantastic result so grab your trip, cable release and tripod and give Focus Stacking a try!

Comments/Questions

Sunday, November 27, 2016

Get More Out of Your Wide-Angle Lens

Many photographers feel that portrait lenses are only 50mm, 85mm and 135mm, which is also why the 70-200mm F/2.8 is the best selling lens in the world whether they are made by Canon, Nikon, Sigma or Tamron.

I know you will think I am crazy but you can actually get more use out of your wide-angle lens than just shooting landscapes. One of the really creative uses for your wide-angle lens is Wide-Angle Portraits!


Wide-Angle Portrait by standing above and shooting down

Now before you start flaming me saying I have gone off the deep end, hear me out. Yes a wide-angle lens will make your subjects face all exaggerate because their nose might look huge and their eyes and ears small, but by shooting creatively you can make that wide-angle to create some really awesome shots.

Instead of shooting your subject head on like you would with a regular portrait lens, try shooting them from above, pointing the wide-angle lens down at them, or if you are shooting a full body portrait, shoot from their feet. Why would you shoot at their foot level??? Well because you will make them seem taller. Every wonder how Hollywood can make an actor 5 foot 6 look 6 feet tall, well they shoot them from down low with a wide-angle lens and *BAM* Tom Cruise looks like he’s 6 foot tall instead of 5 foot 7.

Getting down low with your Wide-Angle creates a new perspective
 Another great use for your wide-angle lens as far as portraits go is the Environment Portrait as you can capture your subject and more of their surroundings. Now one thing to keep in mind when shooting with your wide-angle, get closer or you end up with them looking like an action figure instead of an action hero.


Hercules - this image borrowed from Digital Photography School.com

Even when using your wide-angle for landscapes, make them more interesting by shooting at ground level. If you are afraid to lay down on the ground, crouch and set the camera on the ground and shoot. It might be a little tricky to get your focus lock, but if you use Back Button Focus, it’s much easier.

Additionally, you can shoot multiple people and placing them at different distances you can make some really cool looking photos!


Environmental Portrait from Digital Photography School.com
 Now that I got your creative juices flowing, grab that wide-angle lens and make some awesome images!

Comments/Questions

Sunday, October 30, 2016

Enough with the Pixels

So this week I got my copy of the new B&H catalog and on the rear cover is an ad for Canon’s new Cinema camera that is capable of 4.5K video. Every time I see this kind of stuff I think to myself, enough with the fake perceived new pixel resolution. The thing that irritates me the most is consumers being suckered into buying these products.


Why am I so annoyed, well because unless you read the articles about it over the last couple of years, most neuroscientists agree that these resolutions are undetectable by the human eye.

"There's going to be some density beyond which you can't do any better because of the limits of your eye," said Don Hood, a professor of ophthalmology at Columbia University, in a phone interview with NBC News.

A person's field of vision covers about 200 degrees, a little more than a semicircle. At arm's length their index finger's fingernail will appear to be about the width of one of those degrees. Imagine that fingernail covered in 120 alternating black and white stripes — being able to discern those stripes at that distance is just about the theoretical limit of the human eye.

In reality, though, hardly anyone has such superb vision. In fact, most people would be unable to discern pixels or lines twice that size. And whether a phone or tablet display meets that standard depends on how far it it is from the viewer. In a living room, a viewer's 40- to 60-inch TV is positioned at a fixed distance, probably seven to nine feet away. Unless pixel-hungry TV fans buy far larger set, or push their couches much closer, any increases in resolution simply won't be perceived.

Most experts agree that 3D was a more meaningful invention than 4K because at least 3D can be seen by the human eye.


So if piling on more pixels isn't the next big thing — despite what TV makers and retailers will try to tell shoppers over and over again — what is? Experts said there are plenty of ways displays could improve.

Neuroscientist point to newly developed "quantum dot" technology for displays that is already leading to far better color representation on some devices. Advancements in dynamic range, leading to displays capable of showing light and shadow in movies and games the way we see them in real life.

When you're in a scene where there's indoor stuff, outdoor stuff, glossy materials reflecting other lights ... that dynamic range is huge,. Consumer-grade displays don't get that stuff right.

Some of the great masters, the painters, they knew things about light and shadow. They kind of knew instinctively how the retina works. In other words, perhaps the secret to a better TV is hidden in the smile of the Mona Lisa.

So, keep all of this in mind, not only when you buy TVs and other displays, but also when buying newer cameras. If you think your customers will prefer the new 4.5K or 5K video, you are wasting your time, better to stick with what actually works, rather than having clients upset because you shot their wedding in 5K and they cannot see a quality difference.


Comments/Questions

Sunday, October 16, 2016

Light Field Photography

This week I wanted to write about a new style of photography that I have recently started playing with, called Light Field photography.

A light field camera, also known as a plenoptic camera, captures information about the light field emanating from a scene; that is, the intensity of light in a scene, and also the direction that the light rays are traveling in space. This contrasts with a conventional camera, which records only light intensity.


In this image, the focus is on the mailbox.
The first light field camera was proposed by Gabriel Lippman in 1908, and he called his concept “integral photography”. Lippmann's experimental results included crude integral photographs made by using a plastic sheet embossed with a regular array of microlenses, or by partially embedding very small glass beads, closely packed in a random pattern, into the surface of the photographic emulsion.

In 2004, a team at Stanford University Computer Graphics Laboratory used a 16-megapixel camera with a 90,000-microlens array (meaning that each microlens covers about 175 pixels, and the final resolution is 90 kilopixels) to demonstrate that pictures can be refocused after they are taken.

Lytro Inc. was founded in 2006 by Res Ng, a graduate of Stanford University and inventor of the Lytro Light Field camera line.

In this version of the same shot as above, the focus is on the car.

Features of a light-field camera include:
    1) Variable depth of field and "refocusing": Lytro's "Focus Spread" feature allows the depth of field (depth of focus) of a 2 dimensional representation of a Lytro image to be expanded after a picture has been taken. Instead of having to set the focus at a particular distance, "Focus Spread" allows more of an 2D image to be in focus. In some cases this may be the entire 2D image field. Users also are able to "refocus" 2D images at particular distances for artistic effects. The ILLUM allows the "refocus-able" and "Focus Spreadable" range to be selected using the optical focus and zoom rings on the lens. The ILLUM also features "focus bracketing" to extend the refocusable range by capturing 3 or 5 consecutive images at different depths.
  
    2) Speed: Because there is less need to focus the lens before taking a picture, a light field camera can capture images more quickly than conventional point-and-shoot digital cameras. This is an advantage in sports photography, for example, where many pictures are lost because the cameras auto-focus system cannot be kept pointed precisely at a fast moving subject.
   
    3) Low-light sensitivity: The ability to adjust focus in post-processing allows the use of larger apertures than are feasible on conventional cameras, thus enabling photography in low-light environments.
   
    4) 3D images: Since a plenoptic camera records depth information, stereo images can be constructed in software from a single plenoptic image capture.

Wedding side by side, image from PetaPixel
 I have recently started using a Lytro Illum camera myself and I like the camera a great deal. Is it perfect for every situation, probably not, but one of the nice aspects of the camera is if you are shooting sports, you can shoot faster with the Lytro Illum as you don’t have to worry about whether or not the AF can keep up. Since the images can be re-focused in the camera or Lytro’s Desktop processing software, you can just shoot away at a football game and then put the images in proper focus later. Some wedding photographers have begun to embrace the Lytro camera as they can take one shot of a bride and groom like this sample image and shift the focus from him to her in a single shot and then export both versions for print.

I have had my Lytro Illum for a few weeks now and I can say that the camera is certainly worth a try, I have captured some really fantastic images with it. Is the Lytro Illlum for everyone? Of course not, but if you have the extra $350 to spend and want to take your creativity to the next level, go ahead and give it a try!


Comments/Questions

Sunday, September 11, 2016

New Third Party Manufacturer

This week I wanted to write and make everyone aware of a new third party builder for photography accessories, YONGNUO.

Some of you may have heard of them before and some of you may not, but YONGNUO has been around for a few years now and they started out making knock-offs of Canon and Nikon’s Speedlites.


If you are familiar with them, their first generation of Speedlites had issues with getting hot while using them or failing after short periods of time, but lately their quality has improved dramatically, to the point where now many Pros are buying their Speedlites and using them full time. Their newer YN560 Mark IV Speedlite is as good as the Canon 580 EX Mark II and has all the same features, (I Know because I own both Canon’s and YONGNUO’s models). And their newer YN600EX-RT is giving Canon’s new 600EX-RT a run for it’s money.

Photography is an expensive business to get into and anywhere you can save some money, you are doing well. YONGNUO’s YN560 Mark IV costs $69.00 compared to Canon’s 580EX Mark II’s $449 and the YN600EX-RT is $119 compared to Canon’s 600EX-RT at $499.


But in the last 2 years, YONGNUO has started making knock-off lenses as well to compete with Canon, Nikon, Tamron and Sigma. The first lens that YONGNUO offered was a total knock-off of Canon’s EF 50mm F/1.8 “Nifty Fifty”. Not only does the YONGNUO model look identical to Canon’s but in reviews, it shoots about 98% as good as Canon’s. The difference, Canon’s is $130 and the YONGNUO 50mm F/1.8 runs $56!


And now YONGNUO has released their own 35mm F/2 prime lens for both Canon and Nikon. The YN35mm F/2 looks identical to the Canon 35mm F/2 but where the Canon model runs $599, the YONGNUO model runs $94. I read a LOT of positive reviews of the YN35mm so this week I bought one myself and it arrived on Saturday and I took a couple of quick test images with it and was VERY impressed myself! I also discovered when processing in Lightroom that even though Lightroom doesn’t recognize the lens by default, the Canon EF 35mm F/2 lens profile works perfectly!


So, for those of you looking to save money, especially while attending AI, you have save a ton with YONGNUO Speedlites and lenses! Now I mentioned that I would show you how well the YN35mm F/2 lens works, well here are a couple images I shot with mine.


Comments/Questions

Sunday, August 28, 2016

Focus Screen Part 2

In my last blog post I talked about the Focus Screen on your camera and what it does. This week I am writing part two of this article on how to replace or clean your Focus Screen properly so that you can always have a clear viewfinder to look through.

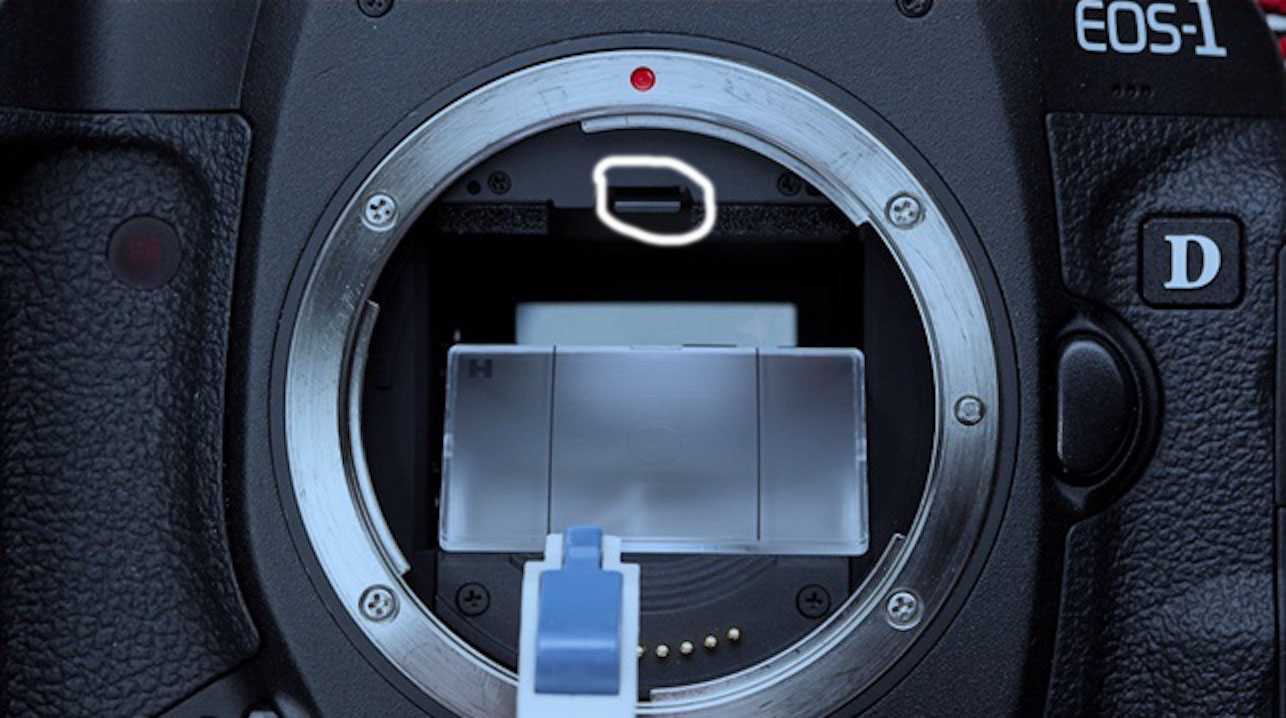
To remove your Focus Screen for cleaning or replacement, you need a Focus Screen tool. This is a special, plastic, tweezer-like tool that can grab the Focus Screen by it’s little tab and remove it safely. If you take off your lens and lay the camera on it’s back, look at the top of the lens opening and you will see a small metal tab. Flip that down carefully with your finger or tweezers and that releases the frame, and there the Focus Screen is.


Focus Screen release tab is circled in white.

Once you have flipped the Focus Screen frame switch, the frame drops down on it’s own and you can see the Focus Screen. Using the Focus Screen tool, grab the Focus Screen by the tab and gently lift it out of the camera.
New Focus Screen and grabber tool in the plastic box
 To clean the Focus Screen, Canon recommends you use a Rocket Blower first to see if you can blow any of the particles off the Focus Screen. You can then re-insert it with the tool, close the frame and look through your viewfinder to see if you were successful. If not, remove the Focus Screen again and you can try cleaning it with soap and water.

Prepare some warm water in a small dish or cup, you can use Distilled water but it’s not required. Add a small amount of dish soap like Dawn or whatever you have in your kitchen. Put the Focus Screen in the solution and let it soak for a bit, remove it from the solution and gently brush it with a horsehair brush, like a small paint brush, new of course, that people use to paint models.

Next, use your Rocket Blower and blow the Focus Screen dry, never use your breath. You can use compressed air, but make sure you don’t freeze the Focus Screen by blowing it too closely with the compressed air. Once you feel it’s clean, and dry, put it back into the frame and snap the frame back into place. Never touch the Focus Screen with your fingers, other than by the side edges as the oils in your skin will make a mess of the Focus Screen and that oil is pretty much impossible to get off again according to Canon.

Rocket Blower for cleaning sensor and Focus Screen

Check your viewfinder again, if it’s clear, you are good to go! I sometimes try to clean my Focus Screens, but I have bought used cameras and had the Focus Screen just so incredibly dirty that I just replaced it. You can buy new Focus Screens from Canon, Nikon (if you are a Nikon shooter), B&H, Adorama, or Amazon. When you order a new one they come in a nice plastic tray assembly with a snap close lid and the tool comes with it. After I remove my old one and swap it out, I put the old one in the tray and store it in a drawer just in case I need an emergency spare.

Now, if you don’t have the stomach to clean the Focus Screen, you can easily just replace it yourself or take your camera to a camera shop to do it for you. I will warn you that depending on where you live, it can cost you upwards of $200 to have it changed. If you are a CPS member, Canon will clean it for free along with your sensor once a year, but you have to ship it to them and be without your camera for a few days.


Comments/Questions

Sunday, August 21, 2016

Focus Screen Part 1

This week’s blog post I wanted to write about a specific part of the camera system that you may or may not be familiar with, the Focus Screen.

The Focus Screen is a small piece of flat, translucent material, either ground glass or a fresnel lens. It is located inside the front of your camera where the lens mounts and help you acquire focus and frame your shot through your camera’s viewfinder.

Canon Eg-A Focus Screen
 There are various types of Focus Screens for most cameras and they can be either etched or non-etched. There are even Focus Screens which are made specifically for using low light lenses.

Some cameras have plain Focus Screens and others have etched ones that denote the focus points and even have a grid for maintaining your “Rule of Thirds”. Many of the newest mid-range and professional DSLRs have a plain Focus Screen with a monochromatic LCD overlay that reveals the focus points when you depress the shutter button halfway.

One of the interesting things about your Focus Screen, aside from the fact that many people do not realize their camera has one, or that it’s easily replaced, is the fact that if the Focus Screen picks up dirt, many photographers think it’s their sensor that’s dirty when that is not the case. If you are someone like myself that has an OCD thing about even the smallest spec of dust in my field of vision, the Focus Screen can be a source of annoyance.


Image of a dirty Focus Screen, courtesy of Ken Rockwell

Have you ever looked through your viewfinder and noticed little black specs or even tiny black strings? Well, chances are if you have seen this, it is your Focus Screen that is the culprit and not your sensor. Especially if you see the dirt, but it does not show up in your photos.

Cross Section of a DSLR, Number 5 is the Focus Screen
Focus Screens can be a pain to clean and there are specific methods to do so, which I will go into in my next post. For now, either try to ignore the dirt in your field of view if you can, or go on-line and order another Focus Screen and replace your old one. You can generally buy new ones for around $20-$35 a piece, but look up which model your camera came with originally and buy the same one. Most all Canon cameras come with what’s called the Precision Matte “Eg-A” Focus Screen and the new one will come with a special tool to remove the old one and put in the new one. Whatever you do, do not touch the Focus Screen with your fingers. My next post will be on how to remove and replace your Focus Screen as well as how to clean it PROPERLY.


Comments/Questions

Sunday, August 14, 2016

Great Plugins


One of the items that can come in handy for your Post-Production is plugins or add-on software for your Photoshop and Lightroom. These can be handy little programs that can give your images a little extra “pop” to make them really stand out.

The ones I want to talk about today are the Creative Kit 2016 pack by Macphun software. Macphun makes software for Macs only and their plugins are very good and can really take your images to the next level.

Creative Kit 2016 comes with six programs, which are Intensify, Tonality, Snapheal, FX Photo, Focus and Noiseless.

Intensify will help with powerful Structure, Sharpness and Details using Pro contrast and comes with dozens of built in image presets.


Tonality is a Black & White photo editor, which allows you to reimagine your monochrome image editing with hundreds of presets, layers,unique digital controls, authentic grain effects and more.


Snapheal allows you to remove unwanted objects and strangers from your photos. You can cut any odd or excessive details. It also features a Clone & Stamp tool to help you replace them with something nice. I like this one as I think it does a better job at removing objects than Photoshop alone.


FX Photo Studio allows you to experiment with styles and looks for your images. Use the large selection of filters to create customized, unique images, you can combine or apply them selectively for some really “special” images.


Focus allows you to add Pro lens effects without the expensive gear. Use smart blur controls and powerful lens effects, including adding your own bokeh in Post Production.


Noiseless will get rid of digital noise and preserve details in your structure and save your night shots by turning them into crispy & clear images. Have Noiseless work on your images pixel by pixel to make them smooth and vibrant instead of deleting them because of noise.


You can buy the entire Creative Kit 2016 on sale for $129.99, marked down from $339 and you can buy it in installments of $25 over 5 monthly payments. If you search the web you might be able to find it even cheaper, I got a deal through Stack Social and I paid only $53 for the entire kit and the nice thing is you can install it on as many Macs as you want with one license.

One final note, some people Love the new “Photos” app in OS X that replaced Aperture, some people hate it and want Aperture back. I prefer Aperture myself and bought it years ago so I will always have it. But if you do like using the “Photos” app for even minor post production, Macphun has updated Creative Kit 2016 so their plugins will even work in “Photos” as “Extensions” or plugins in the Apple world.

All of these plugins will install into Aperture, Photos, Lightroom, Photoshop and Photoshop Elements so you can use them on whichever of these programs is your favorite.


Comments/Questions

Sunday, July 31, 2016

Another Way to Improve Post Processing Performance

This week I want to write another article on ways to improve your post processing workflow from a performance standpoint. You'll remember I wrote a blog post about tweaks for Lightroom, well today's post will not only speed up Lightroom, but also Photoshop and anything else you are using for Post Production. How can I be certain this will enhance EVERYTHING you say, well because for my day job, I am an I.T. Professional of 25 years.

Some of you may or may not have heard of SSD's also know as Solid State Disks or Solid State Hard Drives, but you may not be sure what they are or how they can benefit you as a photographer. Well an SSD, unlike a conventional hard drive has no moving parts, there are no metal platters inside and no head that reads them similar to an old record player.

Crucial 500GB SSD MX 200 series

 A Solid State Drive is basically a giant memory card, so it can read and write data insanely fast compared to a conventional hard drive which can only read and write at the speed that it's platters spin at. When SSD's first came out 5-10 years ago they were extremely expensive as most anything in electronics or computers, but over time, they become more and more cost effective in comparison to their platter counter-parts.

How will an SSD speed up your Post Processing and workflow? Well, the latest SSD's are capable of reading and writing data at 6GB/s, that's 6 Gigabits per second compared to platter drive which can only write at upwards of 15,000 Bits per second and that's only if you buy the expensive SAS drives, which are usually used more in servers than home computers.

I went this weekend and bought a used Mac Mini Server as a second computer and bought a 2012 model as it is the last year Apple made them user upgradeable, allow you to add more RAM and to easily swap out the hard drive from the old style platter model that only ran at 5,200 RPMs. I then went to Microcenter and bought a nice Crucial MX200 series 500GB SSD in 2.5 inch form factor. The Crucial is the best in SSDs and they have been one of the leading makers of system memory for decades, so it only stands to reason that they would also make the best SSD's since, again, an SSD is nothing more than a massive memory card that plugs into the hard drive ports on your computer and doesn't erase when the system is rebooted or powered off like RAM does. The model I bought it 500GB @ only $149 and will allow either a Windows or Mac based system to boot from cold start to the desktop in 7-15 seconds!

Crucial 500GB SSD plugged into a Windows PC

An SSD will also allow your applications to load hundreds of times faster such as Lightroom, Photoshop, or even Apple Final Cut Pro X video editing software which I use for my DJI Phantom 3 Professional videos. Ever seen that dreaded hourglass or spinning beach ball in Window or Mac? Well kiss them goodbye with an SSD as those kinds of things never happen again. Even though your Windows machine will still need to be defragmented now and then, image your Defrag only taking minutes instead of hours.

Now I am sure a lot of you are thinking, "How can I get this in my current system?" Well if you are handy with a screwdriver, most people can replace a hard drive themselves and then just restore your Operating System and applications from backups or do a clean install. A Windows 10 install that can take an hour or more on a conventional hard drive can be installed on an SSD in 15-20 minutes! If you don't have the stomach for this work yourself, find a local computer shop that will swap out the drives for you for a reasonable fee. If you do decide to tackle it yourself, Google how to do it as many videos exist on YouTube that will show you step by step how to do it yourself.

Trust me, once you've gone to SSD, you'll never go back to an old style hard drive again and you'll certainly appreciate the boot in speed when doing your Post Production.

Comments/Questions

Sunday, July 3, 2016

Drones and Your Photography Business

So this past week PPA (Professional Photographers of America) sent out an email that the FAA has released it's new rules on drones for business. According to the new FAA rules, the estimated out-of-pocket cost for an individual to become certified as a remote pilot with a small UAS rating is $150. This will cover the testing fee.


My Phantom 3 Professional hovering in my front yard.

The required aeronautical knowledge test will cover the following subject areas:

- Regulations applicable to small UAS operations

Airspace classification and operating requirements, maintenance and inspection procedures, and flight restrictions affecting small unmanned aircraft operation
Official sources of weather and effects of weather on small unmanned aircraft performance
Small UAS loading and performance
Emergency procedures
Crew resource management
Radio communication procedures
Determining the performance of small unmanned aircraft
Physiological effects of drugs and alcohol
Aeronautical decision-making and judgment
Airport operations.

You'll be able to take the test at more than 700 FAA-approved testing centers. Get more information from the FAA on certification here!

A shot of my cul-de-sac from my Phantom 3 Professional
 There are also some new changes in the rules that will becoming out in August 2016, so you may want to wait a few more weeks to actually start the licensing process. Remember, you are ultimately responsible to make sure you are legal to fly your drone for your business and getting caught without a proper pilot's license will result in hefty fines and possible jail time!

Comments/Questions