Tuesday, October 14, 2014

DIY Creative Tips & Tricks to Try!

There are a multitude of tips and tricks out there for photographers that it seems like we never come across anything new - until now!  Below is a list of eight totally weird but totally cool tid-bits of knowledge to add to your growing inventory of photographic wisdom!  Some you may be familiar with, but I guarantee there is something new here to consider one day!


1.  Don't have a tripod?  Use a lamp!  

Yes, that's right, a lamp has about the same thread size as the filter thread used on tripods.  If you're in a bind or feeling innovative try this out!


2. A PEZ dispenser will fit on a hotshoe mount.

Yep, you read that correctly!  Next time you anticipate photographing a young child and need something to help them focus their eyes on your camera, try mounting a cool PEZ dispenser on your camera to capture their attention!

The base of the dispenser is just a tiny bit wider than the mount so you will have to trim a little off using a knife to get it to fit, but I am sure this cheap trick will pay off!


3.  Turn day to night!

Shooting in daylight but not getting enough diversity?  Try this trick:

Turn your flash power up really high--even to the maximum.  This will definitely make the subject extremely over-exposed but if you adjust your camera settings to expose for the subject it will make the background look extremely dark because you're not exposing for the ambient light and the flash isn't hitting it.  This will make it look like it’s night time even if it’s the middle of the day.  Try it!


4.  Macro photography without a macro lens.


Take it off, turn it around and shoot!  It is recommended that you use a tripod when shooting this way, maybe this would be a good opportunity to try out that lamp!

"There are four things you need to know about using this trick: (1) Your camera won’t take a picture with the lens off unless you’re in manual mode.  (2) The best focal length seems to be around 50mm, so either a 50mm prime or an 18-55mm kit lens would be perfect! (3) Obviously, you lose autofocus since your lens isn’t attached to the camera.  Focus is achieved by simply moving closer to or further away from the subject, and (4) The camera can’t open up the aperture, so you’ll do it with your hand.  On the back of the lens (the side you mount on the camera), move the little plastic slider piece that controls the aperture.  If you look in the lens while doing it, you’ll see the hole open up." (Harmer)

5.  Delete tourists without all the editing.

Got an awesome shot but people keep getting in the way?

Step 1: Set your camera on a tripod, or lamp.

Step 2: Take a picture about every 10 seconds until you have about 15 shots, depending on how fast and how many people are walking around.

Step 3: Open all of the images in Photoshop using File > Scripts > Statistics.   Choose “median” and select the files you took.  (The “statistics” script is only available in Photoshop Extended or in the Creative Cloud version of Photoshop, however, you can get a somewhat similar effect in recent versions of Photoshop Elements by going to Enhance > Photomerge > Scene Cleaner.)

Step 4: Boom!  Photoshop finds what is different in the photos and simply removes it!  Since the people moved around, it fills the area where someone was standing with part of another photo where no one was there and now you have a clean scene as if you were the only one there!


 6.  Shaped bokeh.

Have you ever seen bokeh with lights in the shape of hearts, trees, or other shapes?  Here is a trick to get the shaped effect without buying an expensive shape kit!  All you have to do is cut out a piece of black paper the size of your lens glass.  Then use a sharp knife or razor blade to cut a shape on in the middle of the paper.  The shape should be slightly bigger than a nickel.  You will only see this effect if you are shooting with a large aperture like 1.4 or so; if you’re shooting at f/5.6 on a kit lens you probably won’t see the effect at all.

I have actually tried this myself and was unable to get a completely satisfying result.  I definitely got it to work--I tried hearts and stars--but I had a really tough time trying to get rid of the vignette.  I was using a full frame camera so maybe if you try this using a crop sensor I would really like to hear about your results!


7.  Circular reflector as a backdrop.

Sometimes when you're on location you might get a shot that would look really good against a white background.  This is where your reflector will come in handy!

"The trick for making this technique work is to use positive exposure compensation.  The camera will try and dim down the white background to a dull gray because it thinks the white is overexposed. About 1 stop of exposure compensation will make the reflector background look bright white." (Harmer)


8.  Insulation reflector board.

Some of my favorite pieces of equipment have cost me less than $1, this is practically no different.

Most circular reflectors only work for a headshots of one person.  You can purchase a large, full-body reflector but they can often cost around $70.  Simply purchase insulation board for $5 and then cover the back and edges with white duct tape.  You can find insulation board with reflective silver backing at any home improvement store and now you will have a large, lightweight multipurpose reflector!


Do you have a cool trick or tip to add to the list?  Let me know in the comments below!  If you get a chance to try one of these out I would love to hear about your experience too!

Thanks for reading today!


Works Cited

Harmer, Jim. "9 Weird Photography Tricks That Actually Work!" improvephotography. Improve Photography LLC, n.d. Web. 13 Oct. 2014.  <http://improvephotography.com/8806/photography-tricks/ >

Harmer, Jim. "bokeh trick." Photograph. improvephotography. Improve Photography LLC, n.d. Web. 13 Oct. 2014.  <http://improvephotography.com/8806/photography-tricks/ >

Harmer, Jim. "candy dispenser camera trick." Photograph. improvephotography. Improve Photography LLC, n.d. Web. 13 Oct. 2014.  <http://improvephotography.com/8806/photography-tricks/ >

Harmer, Jim. "crowd before-after." Photograph. improvephotography. Improve Photography LLC, n.d. Web. 13 Oct. 2014.  <http://improvephotography.com/8806/photography-tricks/ >

Harmer, Jim. "day-night flash." Photograph. improvephotography. Improve Photography LLC, n.d. Web. 13 Oct. 2014.  <http://improvephotography.com/8806/photography-tricks/ >

Harmer, Jim. "JIM4025-300x198." Photograph. improvephotography. Improve Photography LLC, n.d. Web. 13 Oct. 2014.  <http://improvephotography.com/8806/photography-tricks/ >

Harmer, Jim. "lamp camera trick." Photograph. improvephotography. Improve Photography LLC, n.d. Web. 13 Oct. 2014.  <http://improvephotography.com/8806/photography-tricks/ >

Harmer, Jim. "lens backwards." Photograph. improvephotography. Improve Photography LLC, n.d. Web. 13 Oct. 2014.  <http://improvephotography.com/8806/photography-tricks/ >

Harmer, Jim. "reflector board." Photograph. improvephotography. Improve Photography LLC, n.d. Web. 13 Oct. 2014.  <http://improvephotography.com/8806/photography-tricks/ >
Sunday, October 5, 2014

Arrivederci, Adios, Au Revoir, Goodbye

This post is bittersweet because this is my last post as your Sunday Ambassador. As of yesterday I posted my final assignment as a student here at AIOPD. I will admit that I am happy and sad at the same time. I have met some outstanding professors and peers that I will surely miss but I vow to remain in contact with them while I am in graduate school. Before I part ways I've created a list of things that I wish I had known before I started school here. How many can relate?

1. I had to take Science, Math, English, English again and more English.

I will admit that this threw me for a loop. I thought that I was in art school? "How dare they put me into one of these classes!" I'd say to myself. I had to get over it and push forward. Luckily I passed the Math!

2. People can be brutally honest.

Showing my work every week was not a problem until I came across an assignment that got the best of me. I was not confident in that work but I had to show something. I had to learn that feedback is not only in the form of positive comments, but also negative.

3. The IDEA Survey will email you reminders and flood your inbox if you do not do the survey.

I get all my emails on my phone so I can try to check them as they come in. Sometimes I was waiting on an important email when a reminder would come through letting me know that I needed to fill out the survey. Point is, fill out the survey and get it over with.

4. No questions are stupid questions!

As a student I found myself emailing the Professors a million different questions. At times I thought that they would find it irritating but I think that they like when a student ask questions. I think....

5. Invest in quality equipment.

In the beginning I think I had a cheap $20 flash from Amazon. I thought that was all I needed to get me through the class that I was in. The next class required more equipment on top of that. I realized that in order to be prepared, I had to invest in quality equipment that would last me as a student and professionally.

6. The closer I got to the end, the more was expected of me as a student.

No longer could I use the excuse, "I don't know how to do it." I was expected to know video, lighting, HDR, editing and so forth.

7. Finally, I never knew how much I have grown until I look back at my work and see the progression.

I love going back and seeing where I came from. I have learned so much here at this school that I sort of want to do it again. I credit this school for teaching me to really find out who I am as a photographer.

Also I cannot stress the fact how important it is to BE ORGANIZED! I have a folder name AIOPD and within that folder there are the names of each individual classes. Within that folder is a breakdown of weekly assignments. I cannot stress how important it is to maintain a level or organization because not only does it help you as a student, but as a photographer as well.

With that being said, this is my final goodbye.

Happy Shooting!

Quiana P Jackson. The Dance, 2014.


Thursday, October 2, 2014

The importance of a backup plan.

            A backup plan is an essential part of photography. Not only for your school assignments but also for your jobs you should always have that backup plan. While you always hope everything goes smoothly you never know. If you don't have a plan “B” then you could end up loosing a job or failing your assignment. One thing I always do when I have something that requires a model is I make sure I ask more then one. This way if my preferred model can't make it then I have someone else to take there place. Another important thing to think about is having backup equipment. Especially if you are doing a job for someone. Nothing is more embarrassing then not being able to complete the job because your equipment failed. If you are shooting for a wedding then you could wind up getting sued if you don't get the job done.

            I personally don't have a backup pro body but I do have a mirror less camera that I can use if needed for my assignments. It still shoots in RAW and has the capability to swap out the lens. I wouldn't rely on this camera though if I was doing pro job like a wedding or a Sweet 16. If you can not afford to purchase back up equipment then make sure you rent something to use for those jobs.
         
            There are many rental companies that are available to rent all types of equipment. Depending on how long you need to have the rental equipment it is always cheaper to purchase it is you need something for weeks at a time. However if you just need it for the weekend then by all means rent it. When choosing a rental company you need to look at how they have the rentals set up. Most of them will place a hold on your credit card for most of the replacement cost of whatever you are renting. While this doesn't matter to much with a regular credit card, this can make things very difficult if you are using a debit card. Now suddenly your bank account shows no funds because it is reserved just in case you brake or loose the rental equipment. There are many different rental companies so it doesn't hurt to google them and shop around. Also some of your local camera stores may offer rentals as well.


Thursday Ambassador

Tuesday, September 30, 2014

Faux vs. Pro and What You Know


Here is a simple test to determine how obsessed you are with photography!  I am always so aware of all-things photography and I just love being able to talk the talk now amongst professionals and even about myself as an emerging photographer building a career plan, submitting contributor queries to publications.  Photography has consumed me, how 'bout you?

Read over this list and see how many indicate your obsession:

Top 10 Signs You're Obsessed With Photography


10. You actively look and can actually tell what kind of camera someone is using from over 30 feet away.

9. You have explained “Photoshop” as a medical expense because it’s good therapy.

8. When planning a vacation, your concerned about finding a hotel with wifi so you’ll be able to upload your photos to the web.

7. You own more than one camera bag even though you only have one camera, and, strangely, if you have 2 cameras you still have 3 or more bags...

6. You find yourself calculating exposure settings when you're out 'n about, and you don't even have your camera.

5. You admire at least one of the historic processes, or, have at least tried to pronounce "Daguerreotype"out loud.  (Relax, there's several ways: \də-ˈge-rō-ˌtīp, -rə-; -ˈger-ō-, -ə- also də-ˈge-rē-ō-ˌtīp, -ˈger-ē-) (merriam-webster)


4. When attending a wedding or other celebrations, you are more interested in what the photographer is doing than the event itself.

3. When you see a photo of a model, you find yourself more interested in what lighting was used and what kind of processing may have been done.

2. You understand that 22 is actually smaller than 5.6


1. When admiring a beautiful landscape you think to yourself, “Now that's lovely, but imagine what it will look like when I bump up the contrast and sharpness and clone out that spot there!”


Well, how did you do?  Are you pretty obsessed?  Hold your head high as this mentality separates you from fauxtographers.

We operate in a pretty crowded market and it feels futile to differentiate yourself, but there are actually fewer true professionals than you know.  Fauxtographers have no idea how to actually offer a professional service or market themselves properly.  They cramp our style but you have to stay dedicated to your calling and embrace the crazy obsession you have with photography.

Do you have any signs to add to the list?  I can't be the only one......can I??  Leave me some feedback in the comments!

Thanks for reading!


Works Cited

Anderson, Mark. "photographer-many-cameras." Photograph. markforminneapolis. Mark Anderson Wedding Photography, 5 March 2014. Web. 29 Sept. 2014. <http://www.markforminneapolis.com/>

"Daguerreotype." merriam-webster. Merriam-Webster, Incorporated, n.d. Web. 29 Sept. 2014. <http://www.merriam-webster.com/dictionary/daguerreotype>

"[exposure meter view]" Photograph. nikonmag. Nikon Corp, 14 Feb. 2014. Web. 29 Sept. 2014. <http://nikonmag.com/talk/dx/how-to-see-the-exposure-meter-on-the-nikon-d5100-in.html>

Lourens, Nolte. "tongue-twister." Photograph. comtranslations. ComTranslations,  26 Oct. 2013. Web. 29 Sept. 2014. <http://www.comtranslations.com/translation-blog/improve-your-english-with-these-diction-exercises/>

"Top 10 Signs You Are Obsessed With Photography." photographybb. PhotographyBB,  <http://www.photographybb.com/camera-and-gear/top-10-signs-addicted-to-photography/ >

Friday, September 26, 2014

Blogging when Busy - recent work and the importance of SEO


It's so important to try to blog regularly for your business to bring in traffic from the type of clients you're looking to book. Search Engine Optimization (SEO) is something you'll learn about in various classes, and blogging with posts of at least a couple hundred words and relevant tags will help your web presence thrive. For a decent breakdown of SEO, check out this article from TechRepublic. If you have SEO resources you look to for advice, share them below!

Wedding season has been busier than ever, and my business blog has suffered because of how much work I have. Finally I found a few free minutes to gather images and get a special post published! Today I want to share a recent wedding with you that meant a great deal to me. The flowers at Friendship Park Conservatory in Des Plaines made such a gorgeous backdrop for the very first same-sex wedding I had the privilege of photographing.

Happy Friday, and happy shooting!

-Friday Ambassador

Work Cited:

Matteson, Scott. "SEO 101: How Search Engine Optimization Really Works." TechRepublic. CBS Interactive, 18 Dec. 2013. Web. 26 Sept. 2014

Tuesday, September 23, 2014

Much Ado About Lenses


We need it, we are always wanting more, we sometimes drool over the big fancy ones, and sometimes we can be jealous at what other's are carrying around.  Let's face it, it's not about the size of the lens but how you use it.


Today I am going to provide a detailed brief about all of the important things you need to know about lenses: the basic differences, how to choose the right one, and why you might have to sell a kidney to afford some.  

Many of us have that "dream lens" but another equal portion have no idea what's so special about the seemingly infinite number of lenses out there and how to pick one to upgrade to.  (Don't worry, it wasn't that long ago when I had no idea what an article meant when they were discussing "glass.")  "Kit" lenses, the ones that typically come with your DSLR, will get the job done and you may feel that those are really the only lenses you'll ever need, but prepare yourself for: life after the kit lens.

Sure, the old adage about it's not the camera, it's the photographer is true to an extent, but the lens will "control the image that's projected onto your imaging sensor, and ultimately what photos you are taking home. As such, many photographers would prefer to shoot with an okay camera and a great lens, than a great camera with ho-hum glass attached."  So, what is a great lens? 


First, you need to understand how these different lenses might improve your current photos and finally allow you to take ones that you currently can't.  There are three main categories of lenses: normal (50mm-range), wide-angle/short, (10-35mm), and telephoto/long (55+) and all of those have confusing letters and numbers that provide detailed information such as:

Focal length - expressed in "mm", smaller numbers are wider angles and higher numbers are bigger zooms.  (Reference, the human eye has a focal length equivalent to 30-50mm.)  If the lens has a set of focal length numbers, such as 18-135, that means that it can zoom in and out between those focal angles.  If there is one number, such as 50mm, then this is called a prime lens and it will force you to stop being lazy because your feet will be what zooms it in and out; it forces you to think more about composition and perspective.

Maximum aperture - The lens aperture is shown in several ways, but "whether it's f/2.8, F2.8, or 1:2.8, it all means the same thing and refers to the the maximum amount of light which the lens can gather" at its widest maximum aperture.  You will see lenses with very small numbers such as 1.8, 1.4, and I have even seen 1.2, and this just means it is capable of letting in a huge amount of light through the camera aperture so you will likely have to work with a very fast, maximum shutter speeds to get a good exposure when using it.  They differ in low-light capture abilities, weight, size, close-focusing range, and price and give you that incredible selective focus with shallow depth of field called bokeh.  

There is also a variable maximum aperture meaning that it changes depending on the focal length.  Take, for example, an 18-200mm f/3.5-5.6 lens.  It would have a maximum aperture of f/3.5 when it is at 18 mm and would be maxed at f/5.6 when zoomed out to 200mm; as you zoom in, less light gets to the sensor.  Variable-aperture zoom lenses lose their ability to transmit a constant volume of light as the lens zooms in and out, which is why a zoom starts off wide at f/3.5, but will max out at f/5.6 as the widest aperture.

Constant-aperture lenses, which maintain a consistent maximum aperture, regardless of the focal length, tend to have the wider maximum apertures.  Constant-aperture zooms lenses also tend to be larger, heavier, and typically more expensive.

Lens mount type - Plain and simple, you can't mount a Canon lens on a Nikon camera and vice versa.  This is because of their mount type.  Yes, you can buy adapters, but for now let's just stick to the basics.  An example of the common lens mount types for DSLRs are the Nikon F-mount, Canon's EF or EF-S, the Pentax K, and the Sony Alpha (A) mount.  This is your camera's special receiving end for the lens you will mount to it.  

Format type - (This is where it tends to get complicated so hang on!)  There are about seven different formats but I will cover the most common two: full frame and crop sensor format types.

Canon:  EF lenses cover both full frame and APS-C sensor DSLRs and EF-S lenses are specifically for APS-C "crop" sensor DLSRs such as the 70D, Rebel 2Ti.  

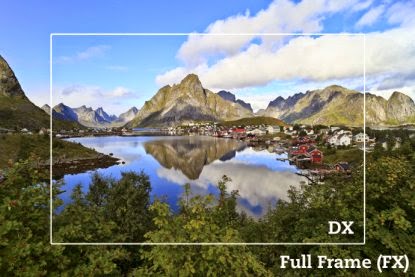
Nikon:  FX lenses cover the full frame sensor in full frame DSLRs like the D610, D810 and DX lenses cover the APS-C "crop" sensors in DSLRs such as the D90, D3200.  The sensor/format difference can be seen in the image below.


Lens manufactures give a 35 mm-format equivalent on lenses designed for cameras with smaller sensors, therefore, if your camera has that smaller APS-C (DX) sensor, you will need to consider the following calculation when deciding which lens you need:

"If you're using a full frame camera there's no calculation needed, a lens will give you the field of view you'd expect from its number. If your camera has an APS-C sensor it has a crop factor of 1.5 - meaning you multiply the lens focal length by 1.5 to get its equivalent 35 mm-format focal length. For Canon APS-C cameras that number is 1.6." (Wilkinson)


Ok, so how do you choose what's right for you?  Ultimately you need to consider how set you are on your current DSLR.  If you plan to upgrade from an APS-C to a full frame camera body sometime soon you should consider upgrading to a lens that's meant for a full frame camera.  Allan Weitz sums up the difference between choosing a prime and variable lens:

"The down side of fixed focal length lenses is that they are not as versatile when shooting subjects that move quickly toward or away from your camera position . . . When shooting with zoom lenses, it's easy to get lazy. When shooting with a fixed focal length lens, you have to physically approach your subject in order to frame the picture properly. With a zoom lens you see something and you zoom in on it. And while there's nothing wrong about shooting that way, one of the benefits of a zoom lens is that it makes it extremely easy to photograph a subject from a variety of vantage points, distances, and focal lengths without having to pause and switch lenses . . . If there were a downside to shooting with zoom lenses, it would have to be that none of them opens up wider than f/2.8, and if they did, they would be quite hefty."


For casual photographers, the slower, least expensive 50mm f/1.8 is sufficient for almost every need. For others, including pros who require even better low-light shooting capabilities, the f/1.4, which is a 1/3-stop faster, may be preferable and even still affordable.  That 85mm f/1.4 seems to be high on the dream-list of "portrait" lenses but it comes with a hefty price tag.  It is the Goldilocks of prime portraits lenses; not too wide, not too long - you don't have to be uncomfortably close to your subject, and it won't compress the depth and make your image look flat.  


"Wide angles lenses should be used when prominent foreground objects are present. The primary mistake made by new photographers is to use wide angles incorrectly - by not being close enough, having no interest in the foreground, or by trying to include too much in the scene. Wide angles are also handy in tight areas, like small rooms, cars, caves, etc. They can give volume to the small area. Wide angles have the potential to drastically change your photography." (Berk)

Standard zoom lenses work well as “walk around” lenses.  They offer versatility between wide or zooming, landscapes and portraits.  These are generally your "kit" lenses: 18-55mm, 18-135mm, 24-105mm for example.  Zooms/telephoto lenses allow you to stand back a little like when the subject is not exactly approachable.  These can also be useful for portraiture, but keep in mind Robert Capa’s words, “If your pictures aren’t good enough, you’re not close enough,” as it is easy to get lazy and let the lens do all the work.  These are also excellent for sports, nature, and wildlife.  With sports though, you need to be able to freeze action sharply which requires a fast shutter speed and faster (larger maximum aperture) zoom lenses are required.  "If sports is one of your primary subjects, a telephoto zoom such as a 70-200 f/2.8 is an excellent choice.  If you really want to shoot like the pros, you’ll want a 300mm f/4, or 300mm f/2.8 or 400mm f/2.8. " (Berk)


Long, even extreme focal lengths and large maximum apertures mean bigger and heavier lenses,
which, along with the bigger price tags, is why they are typically used by professionals who can ultimately justify purchasing them.  Build up to these lenses as you grow as a professional so you don't have to sell an organ on the black market just to add one to your collection.  If you think it is a necessary business expense then that is always a justification too.

This post just covers the basics; I could go on for days about lenses.  There are a variety of other special lenses on the market like a macro lens if you like shooting tiny things or a tilt-shift or perspective correction lens for architecture.  There is a lens to suit every purpose so I hope I have been able to provide some good direction when contemplating purchasing a new tool for your photography endeavors.


Works Cited

"85mm Portrait Philosophy." photo. NameMedia, Inc., 21 May 2011. Web. 23 Sept. 2014. <http://photo.net/nikon-camera-forum/00YlSn>

 Berk, Rick. "Choosing Lenses: When to Use Which Lens and Why." digital-photography-school. Digital Photography School, n.d. Web. 23 Sept. 2014. <http://digital-photography-school.com/choosing-lenses-when-to-use-which-lens-and-why/ >

"Black Market." Photograph. Encyclopædia Britannica ImageQuest. Web. 23 Sep 2014. 
<http://quest.eb.com/#/search/115_2729832/1/115_2729832/cite>

"Hispanic boy thinking at school desk." Photograph. Encyclopædia Britannica ImageQuest. Web. 23 Sep 2014. 
http://quest.eb.com/#/search/154_2899196/1/154_2899196/cite

"Hungary, Budapest, Jealousy, 1892." Photopgraph. Encyclopædia Britannica ImageQuest. Web. 23 Sep 2014. <http://quest.eb.com/#/search/126_3739316/1/126_3739316/cite>

"Monarch Butterfly." Photograph. Encyclopædia Britannica ImageQuest. Web. 23 Sep 2014. 
http://quest.eb.com/#/search/149_2081893/1/149_2081893/cite

Weitz, Allan. "The Canon Lens Experience: Everything You Need to Know about Canon Lenses." bhphotovideo.  B & H Foto & Electronics Corp., Aug, 2014. Web. 23 Sept. 2014. <http://www.bhphotovideo.com/explora/photography/tips-and-solution/canon-lens-experience-everything-you-need-know-about-canon-lenses>

Wilkinson, David. "The DX/FX distinction." Photograph. switchbacktravel. Switchback Travel, n.d. Web. 23 Sept. 2014. <http://www.switchbacktravel.com/camera>


Thursday, September 18, 2014

Why shouldn’t I shoot my family and friends for class?

Just finishing up my Portraiture class and I must say its been the toughest one yet. Not tough because the assignments where hard but tough in the fact that each assignment required a new person. In total I needed to photograph 25 different people in 6 weeks. It was hard to find all these different people and keep them to your schedule. Everyone has family they could always use but the problem with that is your family wont end up as a paying customer later on.  They will always expect you to shoot them for free. It seems pretty sad but that is the way it works.
In all of my assignment this past 6 weeks the hardest was to find 8 people to photograph together. To accomplish this I put some feelers out weeks in advanced but most of those options fell through. My last and final option was to ask a friend if she knew of anyone that I could get to photograph. I figured since she has 3 kids and herself that would kill off half of my requirements right there. However this particular week none of her kids could show up for the event. I was lucky though because she know a lot of other people and found me the 8 I needed in the nick of time. By the end of my shooting I had people asking for a card, wondering if I could shoot an up coming event.
I was grateful that these people who I didn’t know was asking me if could do other work and that they would be contacting me in the future. Without shooting these strangers I would have never got my name or my information out there like I did. I learned the in the end it might pay off to shoot people you don’t know because they may want your services in the future. The event that I was asked about is for the republicans in town so they will probably want a hand out, however it might be one of those handouts that gets your name out there for paying work. These politicians might need head shots or things like that. While doing the event for free might make them think you will do everything for free, you can quickly let them know what you charge for those types of services.

So I recommend getting yourself out there and looking for ways to network and find potential future clients. You obviously wont get paid to shoot them for your class assignments but if they can see the quality of work you can provide them, then you might very well have made a connection to turn them into a client.


Here is my funny face shot of my 8 people. In the end this probably was my best assignment. 


TBT

Thursday Ambassador