One of the things that new photographers battle with is gear purchasing. Many photographers on a budget, especially while in school have a hard time deciding on how to buy the gear they need.
One of the primary things new photographers needs to remember is although it’s nice to have the latest, greatest camera bodies, it’s not as much of a necessity as high quality glass. Whether you are a Canon or Nikon shooter, each company has different varieties of glass with different levels of quality, but this is where you should be spending your money as a new photographer. This first image I shot on Sunday March 5, 2017 at the Folds of Honor QuickTrip 500 at Atlanta Motor Speedway. I did NO post processing, this image is straight out of my camera using the older Canon EF 100-400mm F/3.5 - F/5.6 L USM lens.
Camera bodies get updates almost every year, but lenses change less frequently and when it comes to camera bodies, unless the new model has some new technology that you absolutely need for your photography, you are better off spending your hard earned money on high quality glass. The reason for this is although Canon’s L lenses are really expensive, you can keep using the glass for a long time to come as it doesn’t become majorly outdated in just a couple years.
Even though Canon released a newer 24-70mm F/2.8 Mk II L IS or a new 85mm F/1.2 L USM, many pros are still shooting with the original models as they still take fantastic photos. I know when you look at say the 70-200mm F/2.8 L USM Mk II can sell for $2,000, you can often find the original one used in great condition for $900 and it will still work and make great images for years to come so you are going to get more out of that lens than you will $900-$2,000+ for a new camera body. This second image of Dale Jr's car being pushed from the garage to the pit area for the start of the race I captured with my 50mm F/1.2 L USM lens and again, NO post processing other than the lens profile correction in Lightroom.
There are many sites where you can buy good or even great condition previous model L lenses from reputable companies like KEH, Adorama, or B&H. If you are up on your lens knowledge you can also get good deals on Craigslist or eBay as well. If you want to try out a lens before you buy or be able to use one before you can afford to buy you can go ti sites like Kitsplit or Lumoid.
So, remember, before you spend that tax refund on a new camera body, look at buying newer, high quality glass for your current camera body and you will be amazed at how much better your images can be with high quality glass.
Comments/Questions
Showing posts with label lenses. Show all posts
Sunday, March 12, 2017
Sunday, September 11, 2016
New Third Party Manufacturer
This week I wanted to write and make everyone aware of a new third party builder for photography accessories, YONGNUO.
Some of you may have heard of them before and some of you may not, but YONGNUO has been around for a few years now and they started out making knock-offs of Canon and Nikon’s Speedlites.
If you are familiar with them, their first generation of Speedlites had issues with getting hot while using them or failing after short periods of time, but lately their quality has improved dramatically, to the point where now many Pros are buying their Speedlites and using them full time. Their newer YN560 Mark IV Speedlite is as good as the Canon 580 EX Mark II and has all the same features, (I Know because I own both Canon’s and YONGNUO’s models). And their newer YN600EX-RT is giving Canon’s new 600EX-RT a run for it’s money.
Photography is an expensive business to get into and anywhere you can save some money, you are doing well. YONGNUO’s YN560 Mark IV costs $69.00 compared to Canon’s 580EX Mark II’s $449 and the YN600EX-RT is $119 compared to Canon’s 600EX-RT at $499.
But in the last 2 years, YONGNUO has started making knock-off lenses as well to compete with Canon, Nikon, Tamron and Sigma. The first lens that YONGNUO offered was a total knock-off of Canon’s EF 50mm F/1.8 “Nifty Fifty”. Not only does the YONGNUO model look identical to Canon’s but in reviews, it shoots about 98% as good as Canon’s. The difference, Canon’s is $130 and the YONGNUO 50mm F/1.8 runs $56!
And now YONGNUO has released their own 35mm F/2 prime lens for both Canon and Nikon. The YN35mm F/2 looks identical to the Canon 35mm F/2 but where the Canon model runs $599, the YONGNUO model runs $94. I read a LOT of positive reviews of the YN35mm so this week I bought one myself and it arrived on Saturday and I took a couple of quick test images with it and was VERY impressed myself! I also discovered when processing in Lightroom that even though Lightroom doesn’t recognize the lens by default, the Canon EF 35mm F/2 lens profile works perfectly!
So, for those of you looking to save money, especially while attending AI, you have save a ton with YONGNUO Speedlites and lenses! Now I mentioned that I would show you how well the YN35mm F/2 lens works, well here are a couple images I shot with mine.
Comments/Questions
Labels:
accessories,
canon,
lenses,
Nikon,
Speedlites,
YONGNUO
Sunday, February 7, 2016
Simplicity
A lot of photographers suffer from equipment paralysis. By that I mean they buy too much gear, especially too many lenses and drag too much gear with them out in the field, then they spend all their time thinking about their gear, their settings, etc and none of their time concentrating on their images. What happens then? They end up with crappy photos over and over again, and then keep buying more gear thinking more gear will make they images better.
Next time you go out to shoot, try taking only 1 or at most 2 lenses with you. This should be all you need and you will spend more time concentrating on your images and less time thinking about your gear and your settings.
I challenge myself and the members of my camera club all the time to go out on our monthly shoots and only take one lens to do all their shooting. Move closer or further away as the case may be to get the shot and the framing you need to make that awesome image.
There is an old analogy I learned when I was a kid called K.I.S.S (Keep It Simple Stupid). A lot of professional photographers have learned to keep their gear streamlined and that is how they become so successful. I remember reading on SLRLounge I believe it was about a year ago about one of the most successful wedding photographers in NYC. He shoots ALL of his weddings with a pair of Canon 1Dx bodies and never uses more than a EF 70-200mm F/2.8 L IS USM and an EF 135mm F/2 L USM portrait lens and this pro makes 6 to 7 figures a year shooting weddings!
When asked during the interview why he used such a small amount a gear he said, “To be honest in most cases a photographer seldom needs more than a good 70-200mm F/2.8. It’s the number one lens sold for a reason. I also use the 135mm F/2 L USM because it creates amazing portraits with fantastic bokeh, which is something the majority of brides want in their wedding photos.”
Thinking and a simplified approach to gear is why real pros can shoot with anything, even and iPhone and take amazing photos.
Comments/Questions
Next time you go out to shoot, try taking only 1 or at most 2 lenses with you. This should be all you need and you will spend more time concentrating on your images and less time thinking about your gear and your settings.
I challenge myself and the members of my camera club all the time to go out on our monthly shoots and only take one lens to do all their shooting. Move closer or further away as the case may be to get the shot and the framing you need to make that awesome image.
![]() |
The weekend I went to Ian Henderson's Antique Mall, I shot with nothing but my Canon EF 50mm F/1.4 USM |
There is an old analogy I learned when I was a kid called K.I.S.S (Keep It Simple Stupid). A lot of professional photographers have learned to keep their gear streamlined and that is how they become so successful. I remember reading on SLRLounge I believe it was about a year ago about one of the most successful wedding photographers in NYC. He shoots ALL of his weddings with a pair of Canon 1Dx bodies and never uses more than a EF 70-200mm F/2.8 L IS USM and an EF 135mm F/2 L USM portrait lens and this pro makes 6 to 7 figures a year shooting weddings!
When asked during the interview why he used such a small amount a gear he said, “To be honest in most cases a photographer seldom needs more than a good 70-200mm F/2.8. It’s the number one lens sold for a reason. I also use the 135mm F/2 L USM because it creates amazing portraits with fantastic bokeh, which is something the majority of brides want in their wedding photos.”
Thinking and a simplified approach to gear is why real pros can shoot with anything, even and iPhone and take amazing photos.
Comments/Questions
Labels:
cameras,
difficulty,
gear,
lenses,
photography,
simplicity,
Tips
Sunday, January 24, 2016
"Grey Market", Should You Avoid It?
Another question I get frequently from photographers that are new or photography students is “should I buy “grey market” camera gear and what exactly is it other than cheaper?”
First, let me start by saying ALL the major camera manufacturers are foreign to the USA and have USA counterparts that import and sell their products in the US. Nikon and Canon both have their US offices located on Long Island, NY and most of the rest of them are located in New York City as well.
These US offices are the ONLY source for importing the camera bodies, lenses, etc from the factories in Japan, Germany and elsewhere and selling in the US market with USA warranties.
The reason many people are attracted to “grey market” items is the savings in pricing vs buying in the US. Most of the time, the “grey market” items are made in the same factory as the USA items to the same specs and using the same parts and quality control, but in this day and age there is a LOT of counterfeiting going on out of China, so you have to be very careful.
When you by a “grey market” item, you cannot go to Nikon or Canon US and get service or warranty repair. Even if the item is made in their factory, since it was not imported by the US division and they did not get their mark-up, they are not obligated to honor any warranty and they won’t.
Right now their is a large legal battle between Canon and “Grey Market” sellers on eBay. Canon USA is suing them for hurting their business, which is odd as the “Grey Market” sellers have been doing it for decades and Canon didn’t seem to care until just recently.
Some of the large, reputable dealers even sell “grey market” lenses at least, B&H is one of them and they even have a “grey market” section on their site that explains this. Now in the case of a large company like B&H, they offer a comparable warranty on their “grey market” items and service and warranty them through their massive store in NYC.
Many people have differing opinions on “grey market”, my opinion is do your homework and then decide for yourself. I have bought some “grey market” lenses as the savings were huge compared to buying the USA model and the dealer I bought from is very reputable and warranties the items themselves, but not all of them do and many use slick talk and ads to con you out of your money so you do have to be careful. I would NOT buy a camera body “grey market” as it’s the most important piece of my photography set up. I buy genuine USA models only from an authorized Canon dealer so I know when it needs service I can send it to Canon US.
I’ve mentioned in earlier blog posts several ways to save on lenses, like buying them from pawn shops, CraigsList, eBay or from a members of local camera clubs. Most new photographers, and especially photography students don’t have Trust Fund money, so find those deals where you can. I’ve even made a fair share of extra money buying old FD lenses for almost nothing from local pawn shops as they had been sitting on them for 10-12 years and them sell them on eBay for a massive profit and then use that money to buy the new lens or body I wanted.
Is “grey market” for you? Only you can decide that, but be careful and do your homework. Remember the old adage, “if it sounds too good to be true, it probably is”.
Comments/Questions
First, let me start by saying ALL the major camera manufacturers are foreign to the USA and have USA counterparts that import and sell their products in the US. Nikon and Canon both have their US offices located on Long Island, NY and most of the rest of them are located in New York City as well.
These US offices are the ONLY source for importing the camera bodies, lenses, etc from the factories in Japan, Germany and elsewhere and selling in the US market with USA warranties.
![]() |
Image of legit Nikon D7000 USA model box from Ken Rockwell |
The reason many people are attracted to “grey market” items is the savings in pricing vs buying in the US. Most of the time, the “grey market” items are made in the same factory as the USA items to the same specs and using the same parts and quality control, but in this day and age there is a LOT of counterfeiting going on out of China, so you have to be very careful.
When you by a “grey market” item, you cannot go to Nikon or Canon US and get service or warranty repair. Even if the item is made in their factory, since it was not imported by the US division and they did not get their mark-up, they are not obligated to honor any warranty and they won’t.
Right now their is a large legal battle between Canon and “Grey Market” sellers on eBay. Canon USA is suing them for hurting their business, which is odd as the “Grey Market” sellers have been doing it for decades and Canon didn’t seem to care until just recently.
Some of the large, reputable dealers even sell “grey market” lenses at least, B&H is one of them and they even have a “grey market” section on their site that explains this. Now in the case of a large company like B&H, they offer a comparable warranty on their “grey market” items and service and warranty them through their massive store in NYC.
Many people have differing opinions on “grey market”, my opinion is do your homework and then decide for yourself. I have bought some “grey market” lenses as the savings were huge compared to buying the USA model and the dealer I bought from is very reputable and warranties the items themselves, but not all of them do and many use slick talk and ads to con you out of your money so you do have to be careful. I would NOT buy a camera body “grey market” as it’s the most important piece of my photography set up. I buy genuine USA models only from an authorized Canon dealer so I know when it needs service I can send it to Canon US.
I’ve mentioned in earlier blog posts several ways to save on lenses, like buying them from pawn shops, CraigsList, eBay or from a members of local camera clubs. Most new photographers, and especially photography students don’t have Trust Fund money, so find those deals where you can. I’ve even made a fair share of extra money buying old FD lenses for almost nothing from local pawn shops as they had been sitting on them for 10-12 years and them sell them on eBay for a massive profit and then use that money to buy the new lens or body I wanted.
Is “grey market” for you? Only you can decide that, but be careful and do your homework. Remember the old adage, “if it sounds too good to be true, it probably is”.
Comments/Questions
Sunday, December 13, 2015
Portrait Lenses
Since as a photographer portraits will probably be your bread and butter, this is a question that is asked a lot by photography students, “What lens or lenses are best for portraits?”
As a general rule, we recall people’s feature best from what’s called the 15 feet rule. In the case of facial recognition, when we see a familiar face, our brain is triggered to reconstruct an image of that face and those features as they appear from 15 feet away according to researchers, so,in order to achieve realistic proportions, we need to shoot from around 15 feet from the subject.
So, what is the optimum portrait lens? Well it depends on how much of a person you are shooting and show much you want showing. If you want the whole person standing, then you would use a 50-70mm lens, if they sit down then a 50-105mm would work great. If you want a tight head and shoulders shot, then you’d want at least a 200-300mm lens since you want to still be around 15 feet away. Ever see a professional model shoot on location? The photographer is usually using a fat lens on a monopod like a 300mm F/2.8 or even a 400mm F/2.8.
Now I am not advocating that the 15 feet rule is set in stone, different photographers will shoot from different distances to get the look they want. I will sometime used a 50mm and get closer to the subject, with the 50mm, the distance is around 5 feet with a full frame body like I use and I also love, as many photographers do, to shoot portraits with my 85mm portrait lens and when using that lens I can stand at around 9 feet from the subject and fill the frame nicely.
Many photographers these days will just use their 70-200mm F/2.8 for all their portrait work, which is why this particular lens is the most popular and the lens that sells the most by any builder. One thing you do want to remember when shooting portraits is to be mindful of the distance you shoot from as when you get closer you can make the subject’s nose bigger and their ears smaller. Shoot from too far away and you make their face flat.
Also remember your depth of field as generally the idea is portraits is to make the background disappear, you want the background to be blurry and out of focus as your subject is the important part of the image in an portrait.
Comments/Questions
As a general rule, we recall people’s feature best from what’s called the 15 feet rule. In the case of facial recognition, when we see a familiar face, our brain is triggered to reconstruct an image of that face and those features as they appear from 15 feet away according to researchers, so,in order to achieve realistic proportions, we need to shoot from around 15 feet from the subject.
![]() |
Outdoor portrait shot from around 6 feet with my EF 85mm F/1.8 |
So, what is the optimum portrait lens? Well it depends on how much of a person you are shooting and show much you want showing. If you want the whole person standing, then you would use a 50-70mm lens, if they sit down then a 50-105mm would work great. If you want a tight head and shoulders shot, then you’d want at least a 200-300mm lens since you want to still be around 15 feet away. Ever see a professional model shoot on location? The photographer is usually using a fat lens on a monopod like a 300mm F/2.8 or even a 400mm F/2.8.
Now I am not advocating that the 15 feet rule is set in stone, different photographers will shoot from different distances to get the look they want. I will sometime used a 50mm and get closer to the subject, with the 50mm, the distance is around 5 feet with a full frame body like I use and I also love, as many photographers do, to shoot portraits with my 85mm portrait lens and when using that lens I can stand at around 9 feet from the subject and fill the frame nicely.
![]() |
Environmental portrait of WWII actor shot from around 15 feet with 70-200mm lens at 200mm |
Many photographers these days will just use their 70-200mm F/2.8 for all their portrait work, which is why this particular lens is the most popular and the lens that sells the most by any builder. One thing you do want to remember when shooting portraits is to be mindful of the distance you shoot from as when you get closer you can make the subject’s nose bigger and their ears smaller. Shoot from too far away and you make their face flat.
Also remember your depth of field as generally the idea is portraits is to make the background disappear, you want the background to be blurry and out of focus as your subject is the important part of the image in an portrait.
Comments/Questions
Sunday, October 4, 2015
Ways to Improve as a Photographer
This week I want to post ways that I think we need to use to always grow and improve as photographers.
1. Stop posting on photography forums. Too many times when lots of photographers post to the same forum the work starts to look too much alike. We want to always strive to be fresh and different.
2. Begin looking at art sites more often. Don’t always just look at photography sites, spend more time looking at art in other mediums for inspiration.
3. Start going to more museums and traveling exhibits, this is another excellent way to get inspiration.
4. Read and look at classic and contemporary art books.
5. Force yourself to use a different lens each time you shoot. Often we get stale in our photography if we use the same lens all the time as we tend to always shoot the same kind of stuff.
6. Purposely stop taking the same kinds of shots when out in the field, recognize your habits and try to break them.
7. Start personal art projects, even if they aren’t popular with others.
8. Keep your eye on new technology, software and hardware, even if it’s not directly photography related. There might be a way you can use this new tech in your art.
9. Use your smartphone as a whiteboard to spitball ideas and possibly catch ideas and subjects that maybe you had not thought of before.
10. Ask “what if ___?” a lot and try to use your curiosity to come up with fresh, new ideas and projects to shoot.
I, and many others, find lists like this a great way to keep our work fresh and new at all times. Sometimes as artists, we hit a rut and then have a hard time coming up with new ideas for our creative outlet. By keeping a list like this handy, hopefully, we can always continue to come up with new things to shoot and work on and always keep things fresh and new.
Comments/Questions
![]() |
Railroad crane shot at Southeastern Railway Museum |
2. Begin looking at art sites more often. Don’t always just look at photography sites, spend more time looking at art in other mediums for inspiration.
3. Start going to more museums and traveling exhibits, this is another excellent way to get inspiration.
4. Read and look at classic and contemporary art books.
![]() |
Prayer bowls at Laotian New Year's 2014 |
6. Purposely stop taking the same kinds of shots when out in the field, recognize your habits and try to break them.
7. Start personal art projects, even if they aren’t popular with others.
8. Keep your eye on new technology, software and hardware, even if it’s not directly photography related. There might be a way you can use this new tech in your art.
9. Use your smartphone as a whiteboard to spitball ideas and possibly catch ideas and subjects that maybe you had not thought of before.
10. Ask “what if ___?” a lot and try to use your curiosity to come up with fresh, new ideas and projects to shoot.
I, and many others, find lists like this a great way to keep our work fresh and new at all times. Sometimes as artists, we hit a rut and then have a hard time coming up with new ideas for our creative outlet. By keeping a list like this handy, hopefully, we can always continue to come up with new things to shoot and work on and always keep things fresh and new.
Comments/Questions
Sunday, August 30, 2015
Always Be Prepared!
Once of the biggest things that you have to learn to do as a photographer is to Be Prepared! Just like the Boy Scout motto, you need to be ready all the time to capture that image when you are working in the photography field. This is especially true when you are a photojournalist but it applies to anyone who is making their living with a camera. You want to be ready all the time so you don’t miss a shot. Here are some tips for making sure you are always as ready as possible.
1.) Batteries - Make sure you always have your batteries charged fully and ready to use. It is also recommended to have spares with you wherever you go.
2.) Memory cards - Like batteries, memory cards are another item you can never have too many of and with the low cost of memory these days, you can easily carry several spares on you at all times.
3.) Lens caps - Leave them off when you are carrying around your camera. Nothing more embarrassing then pulling up your camera to snap a once in a lifetime shot and then realize you left your lens cap on. An easy and inexpensive way to protect your glass is a UV filter on the end.
4.) Carry more than one camera - If you look at pros out in the field, especially photojournalists, they never waste time changing lenses out in the field, they take two bodies, one with a wide lens and one with a telephoto so they are ready for anything that may happen.
5.) Turn off Image Preview - I never use my image preview when shooting and I don’t recommend anyone does. If you spend all your time looking at your shots on the LCD as you take them, you are going to miss a great shot sooner or later. Again, watch a pro out in the field with a DSLR and you will never see them looking at their LCD. They know their camera and they know how to use it, so they know without looking if they got the shot or not.
6.) And last but not least, make a checklist. Just like a pilot, if you make a list of all the items you need with you when you go out and check it the night before and again the day of the shoot or when you leave the house, you will be prepared for anything that happens and be able to just shoot away. And if God forbid a meteor falls and takes out both your cameras, just laugh at the irony and whip out that iPhone and snap away, you can still get that shot!
Comments/Questions
![]() |
I was shooting a car show one Saturday and came across this house fire |
2.) Memory cards - Like batteries, memory cards are another item you can never have too many of and with the low cost of memory these days, you can easily carry several spares on you at all times.
3.) Lens caps - Leave them off when you are carrying around your camera. Nothing more embarrassing then pulling up your camera to snap a once in a lifetime shot and then realize you left your lens cap on. An easy and inexpensive way to protect your glass is a UV filter on the end.
4.) Carry more than one camera - If you look at pros out in the field, especially photojournalists, they never waste time changing lenses out in the field, they take two bodies, one with a wide lens and one with a telephoto so they are ready for anything that may happen.
5.) Turn off Image Preview - I never use my image preview when shooting and I don’t recommend anyone does. If you spend all your time looking at your shots on the LCD as you take them, you are going to miss a great shot sooner or later. Again, watch a pro out in the field with a DSLR and you will never see them looking at their LCD. They know their camera and they know how to use it, so they know without looking if they got the shot or not.
![]() |
One of the firefighters from the house fire I came across |
Comments/Questions
Sunday, August 16, 2015
Building a System
One of the things I want to share with you the readers is how to build your photography system or what to bring with you when you go out to shoot.
The first, and easiest thing to choose is your camera body, once you decide what brand to go with, Canon, Nikon or another, then it’s a matter of getting the right lenses. Do you want to shoot crop or full frame and what can you afford on your budget, don’t spend yourself into debt buying a camera body. I shoot Canon and a lot of Canon shooters run right out and buy the latest full frame, whether it’s the 6D, 5D Mark III or 5D R or 5D SR, or maybe even the 1D X. Most of these cameras are very expensive, anywhere from $2,500 to $6,500 for the 1D X.
I generally recommend buyer earlier models, especially if you are on a budget and want to get the most ‘bang’ for your buck. You can go on Craigslist or eBay and buy a great condition Canon 5D Classic for a few hundred dollars and most Canon shooters will tell you that the 5D Classic is still an awesome camera and between the various 5D models, still shoots landscapes better than the newer models do. I personally own 2 5D Classic and love them both, they might not have all the ‘bells and whistles’ of the Mark II or Mark III but they do what they are designed to do, take awesome images. I usually also recommend buyers good condition used camera bodies as you can not only save money but you can also afford to carry a backup or second camera.
As I mentioned, I have 2 of the 5D Classics and spent only around $400 for each one and then earlier this year, I did buy a new Canon 6D full frame body as well. I got my 6D from www.lumoid.com for $1,200 (considerably cheaper than $1,700 from Amazon or canon.com), plus I got the $300 rebate from Canon that they were offering at the beginning of the year. Now, instead of spending $2,500 for a brand new 5D Mark III and having one camera, I spent $1,700 and have three camera bodies, all of which are full frame!
Next, when it comes to lenses, you don’t want to cover every millimeter of focal length. First, it will cost you a lot of money, second it’s more gear to carry and more time wasted changing lenses rather than making images. Most of your pros, including famous ones like Ansel Adams never carried more than three lenses when they are out shooting. If you have three bodies like I do, I carry all three when I am out shooting for a day and I equip each one with a specific type of lens.
I put my trusty Canon EF 17-40mm F/4 L USM on one body so I can capture fantastic landscapes. I equip the second body with my 85mm F/1.8 USM portrait lens so I can shoot people or street photography. My third body I equip with my Tamron SP 150-600mm super telephoto lens incase I need something with more reach to capture a shot of a red-tail hawk I spot sitting on a power line or in a tree. I know you are thinking ‘that’s a lot of gear and weight to carry around’, but I am used to it and I use the kind of camera carry systems that make carrying all this gear easy. I have the Spider Pro belt that I mount one body on my hip like a six shooter, I have the Camera Carry Pro clip system that I can also attach to my belt or a small backpack that carries the second body and then for my super telephoto lens/body combo, I use my Manfrotto monopod, which can double as a walking stick.
If I am out shooting mostly landscapes for my Forgotten Pieces of Georgia, then the body with the Canon EF 17-40mm F/4 L USM is the one in my hand at the ready and the other two are standing by for shots of opportunity. By employing this strategy I am always ready for any shooting opportunity that presents itself and never have to change lenses in the field and don’t have to worry about sensor dust.
As I mentioned earlier, you do not need to cover every millimeter of focal length, do like the pros do and move closer or farther away and you can more than make up for not having every millimeter covered in lenses. You can even cut it down to two bodies and lenses and say carry a 17-40mm and then a 70-200mm, as the 70-200mm can be used for both portrait and zoom work, since it covers the two most popular portrait focal lengths of 85mm and 135mm.
Now that I have shared more on how to build your system, feel free to leave a comment or post a question, and get out there and make some great images!
Comments/Questions
The first, and easiest thing to choose is your camera body, once you decide what brand to go with, Canon, Nikon or another, then it’s a matter of getting the right lenses. Do you want to shoot crop or full frame and what can you afford on your budget, don’t spend yourself into debt buying a camera body. I shoot Canon and a lot of Canon shooters run right out and buy the latest full frame, whether it’s the 6D, 5D Mark III or 5D R or 5D SR, or maybe even the 1D X. Most of these cameras are very expensive, anywhere from $2,500 to $6,500 for the 1D X.
I generally recommend buyer earlier models, especially if you are on a budget and want to get the most ‘bang’ for your buck. You can go on Craigslist or eBay and buy a great condition Canon 5D Classic for a few hundred dollars and most Canon shooters will tell you that the 5D Classic is still an awesome camera and between the various 5D models, still shoots landscapes better than the newer models do. I personally own 2 5D Classic and love them both, they might not have all the ‘bells and whistles’ of the Mark II or Mark III but they do what they are designed to do, take awesome images. I usually also recommend buyers good condition used camera bodies as you can not only save money but you can also afford to carry a backup or second camera.
As I mentioned, I have 2 of the 5D Classics and spent only around $400 for each one and then earlier this year, I did buy a new Canon 6D full frame body as well. I got my 6D from www.lumoid.com for $1,200 (considerably cheaper than $1,700 from Amazon or canon.com), plus I got the $300 rebate from Canon that they were offering at the beginning of the year. Now, instead of spending $2,500 for a brand new 5D Mark III and having one camera, I spent $1,700 and have three camera bodies, all of which are full frame!
Next, when it comes to lenses, you don’t want to cover every millimeter of focal length. First, it will cost you a lot of money, second it’s more gear to carry and more time wasted changing lenses rather than making images. Most of your pros, including famous ones like Ansel Adams never carried more than three lenses when they are out shooting. If you have three bodies like I do, I carry all three when I am out shooting for a day and I equip each one with a specific type of lens.
![]() |
Shot with EOS 6D and EF 17-40mm F/4 L USM |
![]() |
Shot with EOS 5D Classic and Tamron SP 70-200mm F/2.8 Di VC USD |
As I mentioned earlier, you do not need to cover every millimeter of focal length, do like the pros do and move closer or farther away and you can more than make up for not having every millimeter covered in lenses. You can even cut it down to two bodies and lenses and say carry a 17-40mm and then a 70-200mm, as the 70-200mm can be used for both portrait and zoom work, since it covers the two most popular portrait focal lengths of 85mm and 135mm.
Now that I have shared more on how to build your system, feel free to leave a comment or post a question, and get out there and make some great images!
Comments/Questions
Sunday, April 26, 2015
Should I Only Buy Name Brand Lenses?
Another one of the questions I myself and many other photographers get from students is this one, “Should I only buy Name Brand lenses”, i.e. Canon, Nikon, Sony, etc.
To be honest there are no straight yes or no answer to this question. Some of it is personal preference, some of it is your budget. I am a Canon shooter and I love my Canon gear, but do I only buy Canon lenses? Absolutely not! Why, well for one thing, I have an I.Q. higher than 10 points and another, I am NOT rich!
In the past you would usually hear the old adage you get what you pay for but this is no longer the case. Over the last few years third party lens builders have gotten better and better at putting out quality equipment. Tamron, is in my humble opinion, the King of third party lenses, outside Carl Zeiss, who’s lenses are priced so ridiculously high, for manual only lenses, I will never own one.
I consider Tamron the King of third party lenses because I have personally never had a bad Tamron lens nor read any bad reviews on any of them. I have had Sigma lenses that threw all kinds of weird errors when I tried to use them and the image quality had been really weak on some of them I have used but I have read that lately Sigma is getter really good as well. Just like Canon or Nikon, both builders have their low end lenses and their high end lenses. For Tamron, their high end ones are the SP series, and many photographers compare Tamron’s SP series as being nearly as good if not sometimes better than Canon “L” series glass. Image quality, build quality, all on par or better than Canon’s “L” glass, the catch is, Tamron’s SP lenses cost WAY less money.
What is the most popular zoom lens in photography? The 70-200mm lens is by far used by more pros than any other zoom lens every made. Why, well it has what is known in the industry as the “sweet” focal lengths. 70-85mm is popular for portraits as is 135mm and having a max of 200mm is good for most all around shooting, sports, events, etc. Now Canon makes four versions of the 70-200mm “L” series lens. There’s the 70-200mm F/4 L with or without IS (Image Stabilizer) and the 70-200mm F/28. with or without IS. These four lenses vary in price from $800-$2,100 for the new F/2.8 IS II. As most people will tell you, if you want the best lens, go with the F/2.8 with or without IS depending on your wallet. The reason is the faster F/2.8 lets in more light so you can use it in lower light shooting, like if you specialize in shooting bands at concerts or bars as those are very low light situations.
Not everyone wants to spend $2,100 for a single lens, enter Tamron. Tamron offers the same 70-200mm F/2.8 Di VC (Di means fits full frame as well as crop bodies, VC means Vibration Compensation, same as Canon’s IS) for $999-$1,499 depending on who you buy it from. That is considerable savings for the most popular lens in one of the best apertures. I currently have the Canon 70-200mm F/4 USM but plan to pick up the Tamron 70-200mm F/2.8 Di VC as one of my near future purchase.
Hopefully, this article will help you decide where you want to put your money when it comes to lens purchases. Now get out there and make some great images!
Comments/Questions
To be honest there are no straight yes or no answer to this question. Some of it is personal preference, some of it is your budget. I am a Canon shooter and I love my Canon gear, but do I only buy Canon lenses? Absolutely not! Why, well for one thing, I have an I.Q. higher than 10 points and another, I am NOT rich!
In the past you would usually hear the old adage you get what you pay for but this is no longer the case. Over the last few years third party lens builders have gotten better and better at putting out quality equipment. Tamron, is in my humble opinion, the King of third party lenses, outside Carl Zeiss, who’s lenses are priced so ridiculously high, for manual only lenses, I will never own one.
I consider Tamron the King of third party lenses because I have personally never had a bad Tamron lens nor read any bad reviews on any of them. I have had Sigma lenses that threw all kinds of weird errors when I tried to use them and the image quality had been really weak on some of them I have used but I have read that lately Sigma is getter really good as well. Just like Canon or Nikon, both builders have their low end lenses and their high end lenses. For Tamron, their high end ones are the SP series, and many photographers compare Tamron’s SP series as being nearly as good if not sometimes better than Canon “L” series glass. Image quality, build quality, all on par or better than Canon’s “L” glass, the catch is, Tamron’s SP lenses cost WAY less money.
![]() |
Monarch butterfly shot with Canon 70-200mm F/4 L USM |
Not everyone wants to spend $2,100 for a single lens, enter Tamron. Tamron offers the same 70-200mm F/2.8 Di VC (Di means fits full frame as well as crop bodies, VC means Vibration Compensation, same as Canon’s IS) for $999-$1,499 depending on who you buy it from. That is considerable savings for the most popular lens in one of the best apertures. I currently have the Canon 70-200mm F/4 USM but plan to pick up the Tamron 70-200mm F/2.8 Di VC as one of my near future purchase.
Hopefully, this article will help you decide where you want to put your money when it comes to lens purchases. Now get out there and make some great images!
Comments/Questions
Labels:
aperture,
canon,
digital photography,
lenses,
Nikon,
photography,
Sigma,
Tamron
Sunday, March 15, 2015
Camera Carry Systems
One of the toughest decisions you’ll make as a photographer is what carry system is best for your camera?
Today there are a multitude of camera straps and slips and other items for carrying your camera. What one is best for you is a matter of taste and versatility. One of the things that has always bugged me is why do the camera manufacturers give you such a crappy camera strap for your new camera? I mean if you are spending $500+ why don’t they throw in a good, well padded camera strap? The frees ones they give you are cheap thin straps that are very uncomfortable and it annoys myself and many other photographers.
Today am going to talk about some other options for camera straps and carry systems. One of the first I can personally recommend is called the Indigo Marble Soft Padded Black Neoprene Quick Release strap. Some of the things I love about this strap is the fact that it is heavily padded so that it does not cut into your neck or shoulder even with the heaviest camera and lens system attached. It also comes with a quick release system and instead of attaching to your metal strap loops, it attaches to your camera’s tripod mount on the bottom. You don’t lose anything because the strap attachment has it’s own tripod mount so you can use the strap with your tripod. I can wear this strap for hours on a photowalk and have no discomfort at all. It also has quick release clamps so you can set them and the camera will only slide so far up or down on the strap. This makes it quick and easy to slid your camera to just the right position to shoot and then release back to your hip. This strap is a little more expensive at $45 on Amazon but remember the old adage, you get what you pay for.
The second item I will mention and recommend is the Spider Pro holster system. I also have one of these and it’s great as it has a quick release system with a lock to it. You can wear your camera on your hip like a gunslinger in the wild west and raise, release and shoot very quick and easy. Once you are done shooting, slid it back into the holster, lock it and no one can snatch your camera in a crowded street or park. Spider also makes a double camera belt which will allow you to have a camera on both hips, as well as a less expensive Black Widow system which has a velcro fastener instead of a locking belt buckle but it is only for light cameras with a small lens like a 40mm STM Pancake lens. The Spider Pro and Spider Duo Pro are $125 and $250, but the Black Widow is only around $60.
The third option I recommend is a camera wrist strap such as one by Opteka. These are handy little gems and attach to your camera’s tripod mount just like the Indigo and the Spider do. You do need to still use one of the camera’s factory strap mounts and then you slide your hand into the strap and fasten the lock strap around your wrist. This system is nice as you can shoot street photography and someone cannot run up and snatch your camera as it is locked to your hand and wrist. The Opteka can be purchased on Amazon for around $9, which makes it the most affordable camera carry system.
Do you have a preferred camera carry system that I have not mentioned here? Feel free to post in the comments and let me know. Now get out there and make some great images.
Comments/Questions
Today there are a multitude of camera straps and slips and other items for carrying your camera. What one is best for you is a matter of taste and versatility. One of the things that has always bugged me is why do the camera manufacturers give you such a crappy camera strap for your new camera? I mean if you are spending $500+ why don’t they throw in a good, well padded camera strap? The frees ones they give you are cheap thin straps that are very uncomfortable and it annoys myself and many other photographers.
Today am going to talk about some other options for camera straps and carry systems. One of the first I can personally recommend is called the Indigo Marble Soft Padded Black Neoprene Quick Release strap. Some of the things I love about this strap is the fact that it is heavily padded so that it does not cut into your neck or shoulder even with the heaviest camera and lens system attached. It also comes with a quick release system and instead of attaching to your metal strap loops, it attaches to your camera’s tripod mount on the bottom. You don’t lose anything because the strap attachment has it’s own tripod mount so you can use the strap with your tripod. I can wear this strap for hours on a photowalk and have no discomfort at all. It also has quick release clamps so you can set them and the camera will only slide so far up or down on the strap. This makes it quick and easy to slid your camera to just the right position to shoot and then release back to your hip. This strap is a little more expensive at $45 on Amazon but remember the old adage, you get what you pay for.
![]() |
Indigo Marble Neoprene strap |
![]() |
Spider Pro holster system |
The third option I recommend is a camera wrist strap such as one by Opteka. These are handy little gems and attach to your camera’s tripod mount just like the Indigo and the Spider do. You do need to still use one of the camera’s factory strap mounts and then you slide your hand into the strap and fasten the lock strap around your wrist. This system is nice as you can shoot street photography and someone cannot run up and snatch your camera as it is locked to your hand and wrist. The Opteka can be purchased on Amazon for around $9, which makes it the most affordable camera carry system.
![]() |
Opteka camera wrist strap |
Do you have a preferred camera carry system that I have not mentioned here? Feel free to post in the comments and let me know. Now get out there and make some great images.
Comments/Questions
Sunday, March 8, 2015
What Lenses Should I Buy?
One of the questions posed frequently to myself as well as to the professors at AI is this one. The question is a tricky one to answer because there are a couple of factors to consider, such as how much money you can afford to spend and what your photographic style is.
If you shoot landscapes, then you want to buy a wise lens such as a 10-20mm or 17-40mm. Both Canon and Nikon offer a decent 18-55mm as one of their standard kit lens. Although the 18-55mm is a inexpensive one, they make very good images from my experience. Of course if money is not a major concern and you shoot Canon, you can go with either the EF 16-35mm or the 17-40mm L lens. On the Nikon side you have the 14-24mm which is an excellent, high quality lens that makes fantastic images.
For those that want to shoot wildlife or anything else that requires more reach, you can look at 70-200mm, which is an extremely popular zoom used by many professional photographers. At 70-200mm you have the most popular focal lengths in a single lens. Both Canon and Nikon make very high quality lenses in this range, as does Tamron if you are budget minded. This lens is also available in both a less expensive F/4 aperture and the faster, more expensive F/2.8. If you want the F/2.8 without spending $2,000-$3,000, then look at the Tamron, which runs around $1,000 and from every review I’ve read by pros say that it takes every bit as soon an image as the more costly ones made by Canon or Nikon.
Portrait shot using Canon EOS 5D with 28-135mm @ 135mm
Your bread and butter will be portraits, then you want to get a prime portrait lens. The most common lenses for portraits are the 50mm, also known as the Nifty Fifty, 85mm and 135mm. When it comes to Canon, there are three of each the 50mm and the 85mm to choose from and again, it mostly depends on how much you want to spend. The 50mm F/1.8 is inexpensive at around $100 and makes really good images, the 50mm F/1.4 USM is around $400 and is much better build quality and takes even better images. The third is the 50mm F/1.2 L which is very expensive but also makes the best images. In the 85mm, Canon makes the $500 F/1.8, the 85mm F/1.2 L original and the newer 85mm F/1.2 L Mark II. The L series lenses are expensive, running around $2,000 and believe it or not, the less expensive F/1.8 makes much better images. The original L series 85mm had lots of issues with color fringing and the Mark II edition has AF issues. The third and final really good portrait lens on the Canon side is the 135mm F/2 L.
Abandoned Rite Aid shot using EOS 6D with 17-40mm F/4 L
Regardless of what you are going to shoot primarily, it is always a good idea to have 3 or more lenses as you never know when you might need another focal length or prime. I love to shoot landscapes, but like most photographers, I know I need to shoot portraits as well as that is how most of us pay the bills. Since I need to do portraits as well, I own the 85mm F/1.8 USM and the 50mm F/1.4 USM. I am also planning to at some point down the road to buy the 135mm F/2 L so that I have a little more reach.
I hope this information helps you to make some choices on what you want to carry in your camera bag, now get out there and make some images!
Comments/Questions
Sunday, February 22, 2015
How to Keep Your Creativity Fresh
One of the many challenges for photographers when starting out as well as experienced shooters is how to keep your creative juices flowing?
We often times get bogged down with other things, children, day jobs, home and car repairs, or just plain everyday life in general and we can lose our edge. You might be shooting portraits most of the time because it is your ‘bread and butter’ or how you pay the bills but then you get into this rut of shooting the same stuff over and over again and next thing you know, you’ve lost your creative edge.
One of the things I do to try to keep myself creative is I constantly look at things with a ‘photographer’s eye’. Sometimes it works, sometimes it doesn’t but it helps to keep me from hitting a creative rut. I’ll look at things in my surroundings at my day job and imagine how I could photograph them and make them look interesting. I even go as far as to keep my Sony NEX 6 in my backpack all the time, not only so I can shoot any one of the hundreds of accidents I see on my way to and from work but to keep my creative juices flowing.
How would my keyboard look shot from this angle or that? What can I use that I have at my desk to create an interesting effect in my photography? I even do this when I am out shooting for my personal project, ‘Forgotten Pieces of Georgia’, I am never just shooting my project. I love railroad stuff and it’s usually popular on sites like 500px.com, so I take 3 or 4 bodies with me in the car with different lenses so I don’t have to mess around changing lenses, I can just grab a different body and shoot something new along the way.
Plain RR crossing sign, I shot it and made it more dramatic
I know many students will say, “well that’s all well and good but I only have one camera body, I cannot afford to have two or three of them, they are just too expensive”. Depending on your situation, this may be true, but if you have a decent day job, I’ll bet you can afford more bodies. One of the best sources is www.craigslist.org or eBay but I prefer CL as I can meet the person face to face and test the equipment out. You need to remember what I told you in an earlier post, you don’t need the latest and greatest camera to make awesome images and I know the Professors here at AI will back me up on that one. Stop getting hung up on Mega Pixels and the latest bells and whistles and buy what works and is reliable.
I personally have technically eight cameras in my collection. I have the Canon 1D Mark II, Canon 50D, 2 Canon 5D Classics, a Canon 6D, a Sony NEX 6, the iPad Air 2 and my iPhone 6 Plus. Only a couple of these cameras are new models, the rest are up to ten years old but I still use them as they still work and take fantastic images. I also know from personal experience you can go on-line and find say a Canon T1i or T2i for next to nothing. I have seen them sell for as little as $100-$150 and whether you realize it or not, they have the exact same basic technology as the new T5i you got through the school.
If you ask anyone that is knowledgeable in cameras, especially Canon gear, they will tell you to this day that the 1D Mark II and 5D Classic take fantastic images, especially if they are clean and in good working order. The 1D Mark II is around 12 years old but is one of Canon’s first cameras with high frames per second for sports shooting and I also keep it for some studio work as I have the AC studio power supply so I can shoot without batteries for hours and hours. It’s only 8.2MP but anything 6 and higher is more than enough. I actually used it for several of my classes at AI and received compliments for my images shot with it not only from my Professors as well as classmates.
Laotian ceremonial pray bowls, shot while kneeling
So shop around, pick up a spare Canon T1i or T2i or XSi for $100 or so, shoot some test images to see if the sensor is dirty, if it is clean it yourself or take it to a shop and pay $30-$50 to get it cleaned and *BAM* now you have two bodies to use.
Now that you are properly armed for anything, work on new ways to keep yourself creative. Have a 2 year old at home, get down to their level and take a look around. See things from their eyes and then shoot what you see, you’d be amazed and how you can use a simple idea like this to come up with some great new images and keep your creativity going.
Comments/Questions
Sunday, February 8, 2015
Composition
For this week’s blog post I want to talk about composition in your photography. Good composition is making sure you have a strong image without a lot of clutter or unnecessary items in it that detract from the eye of the viewer.
Good composition means your images only contain the “meat and potatoes” as it were to make for an image that the viewer looks at and says “WOW!” When I look through my viewfinder, I am trying to de-focus my eye and attention and concentrate on only what I feel will make the image strong and then move my framing to fit that scenario.
When out shooting, especially landscapes you want to simplify your image and exclude any extraneous items that are not going to add to the image’s overall composition. Many times this will mean moving around both physically and with your camera to change the view and get the exact “picture” that others will look at and their eyes will stay engaged in that final image as long as possible.
Broken Fence - Canon T3i 18-55mm IS kit lens
Many new shooters think that you cannot accomplish all of this with the crop sensor camera you buy through the school. This is not true, as although I prefer my full frame cameras for shooting landscapes, you can still get fantastic landscapes with a crop sensor body. Many of the crop bodies have fantastic wide angle lenses for shooting scenes with strong composition.
Many of the manufacturers have very good to high quality lenses for shooting landscapes even on a crop sensor body. Canon, for example has a really nice EF-S 10-20mm lens that makes fantastic wide landscapes!
I know that sometimes, when shooting there are other objects that detract from an image that you really want, for example a really beautiful church steeple with a fantastic, colorful sky behind it at sunrise or sunset but there are power lines in the field of view and they sit right where it is hard to get around them. You can try moving to a different position, but maybe you cannot get that same sky from a different angle or side of the building, this is when you have to get creative. Try a longer focal length lens to get a tighter framing for the shot. It might not be the larger view that you originally wanted but at least you got the important part without the detracting power lines.
Considering limiting your objects in your view when shooting for your next assignment or shooting for yourself. You will find that your images will be stronger and you should get a better critique from that professor. Throw that final image on a site such as Student Stock or 500px and let other photographers view and rate it to see how you did, you may be amazed with the results.
Comments/Questions
Sunday, January 25, 2015
Mirrorless vs DSLR
Today more and more people are asking myself and others, what’s the difference between Mirrorless and DSLR cameras? Which one is better than the other, and why do both exist?
Well, let’s start with a DSLR as most people know what they are. A DSLR is a Digital Single Lens Reflex camera system. This means there is one lens on the camera and a mirror that reflects what the lens sees and feeds that data into the pentaprism so that we can see what the shot will look like through an optical viewfinder. When the photo is snapped, the mirror flips up out of the way so the light and image hits the sensor directly and the photo is taken. DSLRs are the workhorse of modern photography, but they are heavy and can be more expensive than Mirrorless cameras.
Sony NEX 6 Mirrorless camera 16-50mm F/3.5-5.6
A Mirrorless camera is one that has no mirror assembly, the light and image pass directly through the lens onto the sensor and mirrorless cameras have either an LCD to look at and compose the image with or an electronic viewfinder which feeds the image from the sensor directly to your viewfinder and eye and you see exactly what the sensor sees. This is nice because as you adjust your settings, your eye sees a more accurate rendition of what the final image will look like, but the downside is battery life and speed. My DSLR can shoot up to 1,000 images on a battery charge, where my Sony NEX 6 can only last for around 300-400 shots.
Canon 5D Classic Full frame camera 17-40mm F/4 L
DSLRs have a wider range of lenses to choose from and a much faster Auto Focus system then Mirrorless cameras too, so most any serious photographer is going to shoot with a DSLR. But Mirrorless cameras do have their place and they keep getting better and better all the time. If you shoot nothing but landscapes and portraits, you can get by with just a Mirrorless camera and they do come in both crop sensor models like my NEX 6 as well as full frame models like the Sony A7 series and the Fuji X100 series.
So, which platform is right for you? Only you can decide that. Like I said, if you need fast AF and a wide selection of lenses and want to shoot sports you will want to go with a DSLR, but if you shoot non-action like landscapes and portraits only, certainly give a Mirrorless a try. Mirrorless cameras do also tend to cost less, you can get a new Sony A7 series for a little over $1,000 for a brand new full frame model, where a DSLR full frame will run you $1,800 to $7,000. You can even go to a company like Lumoid and rent a Mirrorless for 3 dys and try it out for yourself. How is the image quality? Check out the two images I post here. One is shot with my Sony NEX 6 Mirrorless and the other with my Canon 5D Classic using the same scene for both images. Which one looks better to you if either?
Now get out there and make some great images!
Comments/Questions
Sunday, January 18, 2015
Should I Upgrade My Gear?
So many times I get questions on whether or not a student should upgrade their gear. “Should I go buy the latest body or lens or upgrade my entire camera platform with a new brand?” If you are asking these questions then the answer is NO.
The T3i (now T5i) camera that students get through the Art Institute is an awesome camera and the 18-55mm lens that comes with it although one of Canon’s inexpensive lenses, takes awesome photos. When it comes to gear if you need a fast 70-200mm F/2.8 to shoot sports of your kids then you will buy it, providing you can afford it and the spouse doesn’t say No.
One of the greatest hangs up that photographers have is always wanting to upgrade their gear when it’s not necessary. They think they need to have the latest and greatest at all times but if you play that game you will be broke and spend less time taking photos and more time learning your new gear.
Now, if you are rich and want to always have the latest gear then by all means, go for it, there’s an old saying, “A fool and his money are soon parted.” But if you are asking me or anyone else if you need to upgrade your gear than you are just looking for an excuse to buy something that is not needed and trying to justify the expense with your significant other.
I personally shoot with older gear myself. Why, because I love to shoot full frame and they are the most expensive bodies. I currently use 2 Canon 5D classics, a 1D Mark II, a 50D and a Sony NEX 6. All of my cameras are older, the 5D classic came out in like 2007, the 1D Mark II came out in 2005, the 50D was new in 2009 and the Sony NEX 6 was new in 2012 I believe.
Female Bald Eagle, shot with Canon 50D and 70-200mm F/4 L
A lot of people have the newer 5D Mark IIs and Mark IIIs but they have more money to burn than I do. I make awesome money at my day job but, I figure, until my photography gets to the point where it pays for the newer gear, I will stick to what I have. The 5D classic, if you read up on it, in comparison, takes better landscapes than the Mark II or Mark III. The newer bodies have more bells and whistles and high megapixels, but if you know anything about photography, megapixels means nothing once you get past 6 anyways.
So, in conclusion, if you are asking “Should I upgrade?” the answer is No. Spend more time shooting, less time worrying about what the next photographer has or the hype of sales people and learn to use what you have. The quality of your images has less to do with your gear, and more to do with whether or not you know how to use it. Remember this quote by the great Ansel Adams, “The single most important component of a camera is the twelve inches behind it!”
Now, as my mentor and friend Professor Jill P Mott says, “get out there and make some great images”!
Comments/Questions
Sunday, December 7, 2014
Best Places to Buy Photography Gear on a Budget
Frequently I hear students say that they don’t have much in the way of photography gear due to cost of ownership. It is true that photography gear is not cheap, unless it’s cheap quality and hence gives cheap results. I’ve had quite a few students ask me how I have acquired so much gear in the last 18 months and I tell them all the same thing, you have to know how to find the deals.
1. Craigslist - Craigslist can be one of the best places to get a good deal on most anything, especially camera gear and lenses. I have bought numerous pieces of gear on this site, but you have to watch out for scammers and always meet people in public places like a coffee shop or store parking lot during the day.
2. eBay - eBay is handy for buying items too as you can find more sellers on there since they are world wide. The problem is you also run into more scammers. Also since you are buying on-line, there is no way to check out the item in person and you can get burned.
3. Pawn Shops - Pawn Shops are a great place to buy used gear and they often have no clue what they have. A person goes into a Pawn Shop to pawn their gear and the shop looks at what the gear sells for on eBay and then offers the seller like 25% of the actual value. If the person forfeits and the Pawn Shop can then sell the item, it is usually months later and the shop doesn’t really keep track of the value, they just price it to make a profit.
4. Local photography clubs - Often times you can find local photography clubs and there will be members selling gear from time to time.
5. Warehouse stores - Another good place are warehouse stores like Sam’s or Costco. Here you are buying new and getting a warranty and you get the better pricing offered by someone that can leverage volume pricing.
6. Amazon - Amazon is another great place to get camera gear and anything else. They have a wide selection of lenses from Canon’s FD to EF and Nikon, Sony and others as well.
70-200mm F/4 L USM and 70-300mm IS USM
The big thing to remember buying used gear is that you can get burned if not careful. If it sounds too good to be true, it probably is but sometimes you do get lucky and the person has no idea what they are selling. I personally bought a Canon EF 70-300mm IS USM lens at a local pawn store for $200 in mint condition. This lens new retails for $900. I also bought a Manfrotto tripod at the same store for $50 and it was missing the release plate that attaches to the camera. I bought a new plate for $7 on Amazon, the tripod with the fluid movement head turned out to be worth $500. Just remember, if you buy used, test it good before you part with your hard earned money. Meet them somewhere public for safety and test the lens or whatever it is on your own camera body to make sure it is fully operational, NEVER take the seller’s word for it.
Good luck with buying more gear and get out there and make some awesome images!
Comments/Questions
Labels:
Amazon,
canon,
Craigslist,
eBay,
lenses,
Nikon,
photography,
Sony,
tripods
Sunday, November 16, 2014
Which Lenses are Better, Primes or Zooms?
Another question I have frequently asked by other students and even members of my photography club is which lens is better, Primes or Zooms?
This is an interesting question and can stir some debate. Primes are lenses with a fixed focal length, such as the Canon 40mm STM Pancake lens or the Canon or Nikon 50mm lenses, known as the “Nifty Fifty”. These lenses are not able to zoom in and out but they are extremely power lenses to have.
Advantages of the Primes is they will be of a wider aperture than the zooms. My 40mm lens is F/2.8 and my 50mm is F/1.4, with the wider aperture, I can use these lenses in much lower light levels than I can say my 28-135mm F/3.5-5.6 lens, which covers the same two focal lengths. There are today zooms than can do F/2.8 but they are very expensive and I don’t want to get off track here.
The other difference with Primes is, since they have a fixed focal length you have to get closer when shooting something. A lot of photographers like to use the “Nifty Fifty” for portraits, but you cannot shoot a portrait of someone from 10-12 feet with a 50mm as you will pick up too much background. Move in to around 3-6 feet and you will get a great portrait, depending on the style you are shooting for. The Prime lens will generally have a sharper focus to it, even at the wide end of it’s aperture and will cost a lot less money than a zoom.
My mailbox shot with the 40mm STM from around 2-3 feet
Zooms do have their places, however, such as shooting at an outdoor event like a concert or fair where you cannot always get close to your subject and really need or want to get the shot. In these situations, yes it’s great to have that handy telephoto zoom lens to get in nice and tight to the subject without risking yourself or interfering with anyone else, say law enforcement at an accident scene. Zooms have come a long way and like a said, a nice 70-200mm F/2.8 is one of the most popular lens from both Canon and Nikon, but it’s also got a hefty price of up to $2,500 where you can get a good prime generally for $140-$700.
My mailbox shot with the Canon 70-200mm F/4 L USM from around 20 feet
So, do both lenses have a place in your camera bag, absolutely, and as a general rule, my Primes and Zooms will usually sit in the bag peacefully without fighting too much. I do challenge you to use your primes more, many photographers tend to get lazy or they are shy and don’t want to get close to their subjects. I encourage you to break out of this mode of thinking and get close to your subjects, as long as you can do so without getting hurt or killed in the process. I’m not telling you to walk up to the lion at the zoo and get in his face with your 50mm, but next time you are shooting people, say on the street, use that 50mm and get up close and personal.
Comments/Questions
Sunday, November 9, 2014
Keeping Your DSLR Sensor Clean
One of the biggest problems we face as photographers is keeping that DSLR sensor clean when shooting, especially when shooting outdoors. Your sensor is the primary component inside your camera for capturing and preserving those moments to the memory card and needs to always be in the best possible condition and clean to take great photos. Dirt, dust, oils and general grime on the sensor will show up on your images and make them look badly such as the example below from The Digital picture.com
Those two spots you see are from sensor dust and they are imbedded in your image. Now you can remove them using Photoshop, Lightroom and some other editing programs, but why not prevent them all together? I am going to give you some tips for keeping the dust and dirt out of your sensor.
Never touch the inside of your DSLR, especially with you fingers. The internal workings behind your lens are not meant for your fingers so, keep them out!
Only change your lens in a semi controlled environment. What I mean by this is don’t change your lenses outdoors in 35mph winds as you are just asking for sensor dirt.
Keep your camera pointed down when changing lenses. I am not sure why so many people don’t get this one. Holding the camera with the opening facing forward or up just invites the dirt in, holding it down makes it harder for it to get in.
Never change the lens with the camera powered on. Will it ruin your camera to do so, no but it will keep a static charge inside the shutter area and allow dust to be drawn to your sensor like a magnet.
I have found, one of the easiest ways to keep my sensor clean is just limit how often I change lenses. I never change them outdoors if I can help it. I carry 2-3 bodies when I am shooting outdoors and I equip one body with a wide angle lens for landscapes, the second one will have a portrait lens of some sort for capturing people and my third will have a nice telephoto zoom for anything else I might need to shoot. Now I know you are thinking “I’m not rich enough to afford 2-3 camera bodies.” You’d be surprised the deals you can find at local pawn shops or yard sales, often people don’t realize what they have and will sell the bodies cheap. Also, who says you need the latest, most expensive body out there. Instead of buying one $1,000-$3,000 body, use that money to buy 2-3 bodies that are cheaper because they are the older model, like getting a Canon 1Ds full frame for $500 that was made in 2004 but still shoots great, instead of the Canon 1Dx which runs $7,000. Too many people don’t seem to realize that it is not the camera that takes the great images, it’s the person behind it.
Until next Sunday, this is the Sunday Ambassador saying get out there and make some great images!
Comments/Questions
Tuesday, September 23, 2014
Much Ado About Lenses

We need it, we are always wanting more, we sometimes drool over the big fancy ones, and sometimes we can be jealous at what other's are carrying around. Let's face it, it's not about the size of the lens but how you use it.
Today I am going to provide a detailed brief about all of the important things you need to know about lenses: the basic differences, how to choose the right one, and why you might have to sell a kidney to afford some.

Sure, the old adage about it's not the camera, it's the photographer is true to an extent, but the lens will "control the image that's projected onto your imaging sensor, and ultimately what photos you are taking home. As such, many photographers would prefer to shoot with an okay camera and a great lens, than a great camera with ho-hum glass attached." So, what is a great lens?
First, you need to understand how these different lenses might improve your current photos and finally allow you to take ones that you currently can't. There are three main categories of lenses: normal (50mm-range), wide-angle/short, (10-35mm), and telephoto/long (55+) and all of those have confusing letters and numbers that provide detailed information such as:
Focal length - expressed in "mm", smaller numbers are wider angles and higher numbers are bigger zooms. (Reference, the human eye has a focal length equivalent to 30-50mm.) If the lens has a set of focal length numbers, such as 18-135, that means that it can zoom in and out between those focal angles. If there is one number, such as 50mm, then this is called a prime lens and it will force you to stop being lazy because your feet will be what zooms it in and out; it forces you to think more about composition and perspective.
Maximum aperture - The lens aperture is shown in several ways, but "whether it's f/2.8, F2.8, or 1:2.8, it all means the same thing and refers to the the maximum amount of light which the lens can gather" at its widest maximum aperture. You will see lenses with very small numbers such as 1.8, 1.4, and I have even seen 1.2, and this just means it is capable of letting in a huge amount of light through the camera aperture so you will likely have to work with a very fast, maximum shutter speeds to get a good exposure when using it. They differ in low-light capture abilities, weight, size, close-focusing range, and price and give you that incredible selective focus with shallow depth of field called bokeh.
There is also a variable maximum aperture meaning that it changes depending on the focal length. Take, for example, an 18-200mm f/3.5-5.6 lens. It would have a maximum aperture of f/3.5 when it is at 18 mm and would be maxed at f/5.6 when zoomed out to 200mm; as you zoom in, less light gets to the sensor. Variable-aperture zoom lenses lose their ability to transmit a constant volume of light as the lens zooms in and out, which is why a zoom starts off wide at f/3.5, but will max out at f/5.6 as the widest aperture.
Constant-aperture lenses, which maintain a consistent maximum aperture, regardless of the focal length, tend to have the wider maximum apertures. Constant-aperture zooms lenses also tend to be larger, heavier, and typically more expensive.
Lens mount type - Plain and simple, you can't mount a Canon lens on a Nikon camera and vice versa. This is because of their mount type. Yes, you can buy adapters, but for now let's just stick to the basics. An example of the common lens mount types for DSLRs are the Nikon F-mount, Canon's EF or EF-S, the Pentax K, and the Sony Alpha (A) mount. This is your camera's special receiving end for the lens you will mount to it.
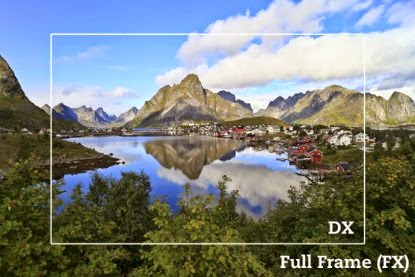
Format type - (This is where it tends to get complicated so hang on!) There are about seven different formats but I will cover the most common two: full frame and crop sensor format types.
Canon: EF lenses cover both full frame and APS-C sensor DSLRs and EF-S lenses are specifically for APS-C "crop" sensor DLSRs such as the 70D, Rebel 2Ti.
Nikon: FX lenses cover the full frame sensor in full frame DSLRs like the D610, D810 and DX lenses cover the APS-C "crop" sensors in DSLRs such as the D90, D3200. The sensor/format difference can be seen in the image below.
Lens manufactures give a 35 mm-format equivalent on lenses designed for cameras with smaller sensors, therefore, if your camera has that smaller APS-C (DX) sensor, you will need to consider the following calculation when deciding which lens you need:
"If you're using a full frame camera there's no calculation needed, a lens will give you the field of view you'd expect from its number. If your camera has an APS-C sensor it has a crop factor of 1.5 - meaning you multiply the lens focal length by 1.5 to get its equivalent 35 mm-format focal length. For Canon APS-C cameras that number is 1.6." (Wilkinson)
Ok, so how do you choose what's right for you? Ultimately you need to consider how set you are on your current DSLR. If you plan to upgrade from an APS-C to a full frame camera body sometime soon you should consider upgrading to a lens that's meant for a full frame camera. Allan Weitz sums up the difference between choosing a prime and variable lens:
"The down side of fixed focal length lenses is that they are not as versatile when shooting subjects that move quickly toward or away from your camera position . . . When shooting with zoom lenses, it's easy to get lazy. When shooting with a fixed focal length lens, you have to physically approach your subject in order to frame the picture properly. With a zoom lens you see something and you zoom in on it. And while there's nothing wrong about shooting that way, one of the benefits of a zoom lens is that it makes it extremely easy to photograph a subject from a variety of vantage points, distances, and focal lengths without having to pause and switch lenses . . . If there were a downside to shooting with zoom lenses, it would have to be that none of them opens up wider than f/2.8, and if they did, they would be quite hefty."
For casual photographers, the slower, least expensive 50mm f/1.8 is sufficient for almost every need. For others, including pros who require even better low-light shooting capabilities, the f/1.4, which is a 1/3-stop faster, may be preferable and even still affordable. That 85mm f/1.4 seems to be high on the dream-list of "portrait" lenses but it comes with a hefty price tag. It is the Goldilocks of prime portraits lenses; not too wide, not too long - you don't have to be uncomfortably close to your subject, and it won't compress the depth and make your image look flat.
"Wide angles lenses should be used when prominent foreground objects are present. The primary mistake made by new photographers is to use wide angles incorrectly - by not being close enough, having no interest in the foreground, or by trying to include too much in the scene. Wide angles are also handy in tight areas, like small rooms, cars, caves, etc. They can give volume to the small area. Wide angles have the potential to drastically change your photography." (Berk)
Standard zoom lenses work well as “walk around” lenses. They offer versatility between wide or zooming, landscapes and portraits. These are generally your "kit" lenses: 18-55mm, 18-135mm, 24-105mm for example. Zooms/telephoto lenses allow you to stand back a little like when the subject is not exactly approachable. These can also be useful for portraiture, but keep in mind Robert Capa’s words, “If your pictures aren’t good enough, you’re not close enough,” as it is easy to get lazy and let the lens do all the work. These are also excellent for sports, nature, and wildlife. With sports though, you need to be able to freeze action sharply which requires a fast shutter speed and faster (larger maximum aperture) zoom lenses are required. "If sports is one of your primary subjects, a telephoto zoom such as a 70-200 f/2.8 is an excellent choice. If you really want to shoot like the pros, you’ll want a 300mm f/4, or 300mm f/2.8 or 400mm f/2.8. " (Berk)
This post just covers the basics; I could go on for days about lenses. There are a variety of other special lenses on the market like a macro lens if you like shooting tiny things or a tilt-shift or perspective correction lens for architecture. There is a lens to suit every purpose so I hope I have been able to provide some good direction when contemplating purchasing a new tool for your photography endeavors.
Works Cited
"85mm Portrait Philosophy." photo. NameMedia, Inc., 21 May 2011. Web. 23 Sept. 2014. <http://photo.net/nikon-camera-forum/00YlSn>
Berk, Rick. "Choosing Lenses: When to Use Which Lens and Why." digital-photography-school. Digital Photography School, n.d. Web. 23 Sept. 2014. <http://digital-photography-school.com/choosing-lenses-when-to-use-which-lens-and-why/ >
"Black Market." Photograph. Encyclopædia Britannica ImageQuest. Web. 23 Sep 2014.
<http://quest.eb.com/#/search/115_2729832/1/115_2729832/cite>
"Hispanic boy thinking at school desk." Photograph. Encyclopædia Britannica ImageQuest. Web. 23 Sep 2014.
http://quest.eb.com/#/search/154_2899196/1/154_2899196/cite
"Hungary, Budapest, Jealousy, 1892." Photopgraph. Encyclopædia Britannica ImageQuest. Web. 23 Sep 2014. <http://quest.eb.com/#/search/126_3739316/1/126_3739316/cite>
"Monarch Butterfly." Photograph. Encyclopædia Britannica ImageQuest. Web. 23 Sep 2014.
http://quest.eb.com/#/search/149_2081893/1/149_2081893/cite
Weitz, Allan. "The Canon Lens Experience: Everything You Need to Know about Canon Lenses." bhphotovideo. B & H Foto & Electronics Corp., Aug, 2014. Web. 23 Sept. 2014. <http://www.bhphotovideo.com/explora/photography/tips-and-solution/canon-lens-experience-everything-you-need-know-about-canon-lenses>
Wilkinson, David. "The DX/FX distinction." Photograph. switchbacktravel. Switchback Travel, n.d. Web. 23 Sept. 2014. <http://www.switchbacktravel.com/camera>
Subscribe to:
Posts (Atom)